Yes, though it’s not exactly what you had in mind. You see, Discord can’t be normally used on the Steam Deck when you’re playing games.
However…. That doesn’t mean you can’t trick the system, heh. The solution is quite simple, and it might sound familiar:
- Switch the Steam Deck to Desktop Mode
- Open the Discover feature
- Look for Discord and open it
- Log into Discord
- Add Discord to the Steam library as a “non-steam game“
- Select “Return to Gaming Mode“
- Use Discord while playing
Disclaimer – I don’t have a Steam Deck, so I won’t be able to walk you through all the steps, but I’ll explain as best as possible.
Disclaimer – I don’t have a Steam Deck, so I won’t be able to walk you through all the steps, but I’ll explain as best as possible.
Below, I’ve prepared a thorough guide to help you use Discord on the Steam Deck, so keep reading 😀
1. Switch the Steam Deck to Desktop Mode
Before you do anything else, you need to enable Desktop Mode on the Steam Deck. This allows you to use the app system.
This is also necessary to find and open Discord. You can’t do it while in Gaming Mode, you see.
To switch to Desktop Mode, you can hold down the Power Button (with the Steam Deck powered on). Then scroll down until you see the “Switch to Desktop” option.
Select it, and you’re done.
Keep reading:
2. Open Discover and then Discord
Next step – open the Discover app on your Steam Deck (it has a shopping bag icon and is on the taskbar) and search for Discord.
You’ll find Discord relatively easily once you’re on the Discover function. Found it? Good, then open it and start logging in
3. Log into Discord
This one is really easy – just log into your Discord account (email and password) and keep it open on the taskbar.
It’s really important – once you log in, don’t close Discord. It NEEDS to run in the background for this solution to work.
4. Add Discord to Steam as a “non-steam game‘
This is the core of this guide – adding Discord as a non-steam game into Steam. I know, Discord is not a game.
But trust me, this works. You may already be familiar with this solution for making other apps work.
I’ll show you how to do this on a computer, but the process will be the same on your Steam Deck:
Step One – Select “Add a game“
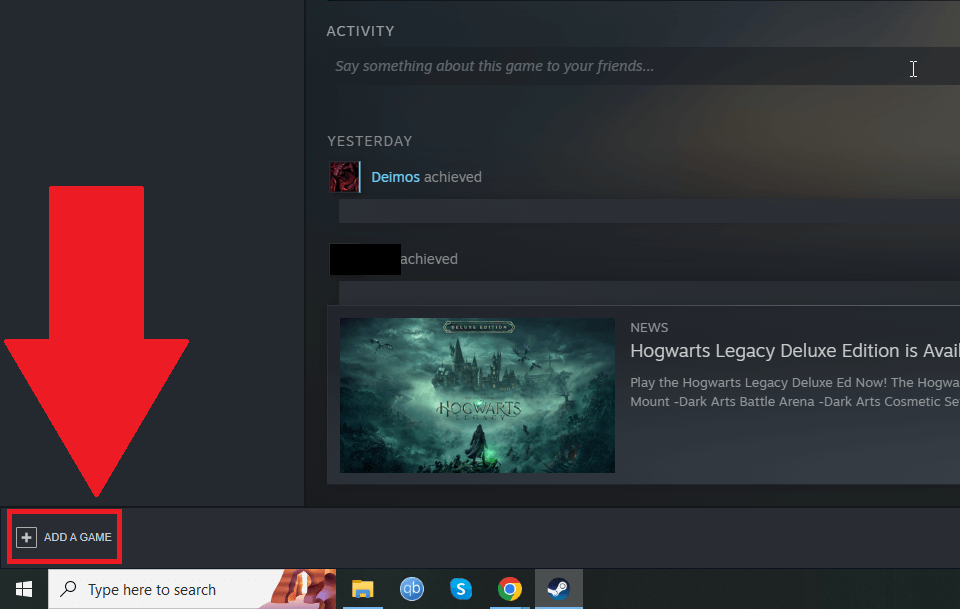
Begin by opening Steam (and logging in if necessary. Then, look for the “ADD A GAME” button somewhere on the app.
On a computer, the button is located in the bottom-left corner. Once you find it, select it!
Step Two – Select “Add a non-steam game…“
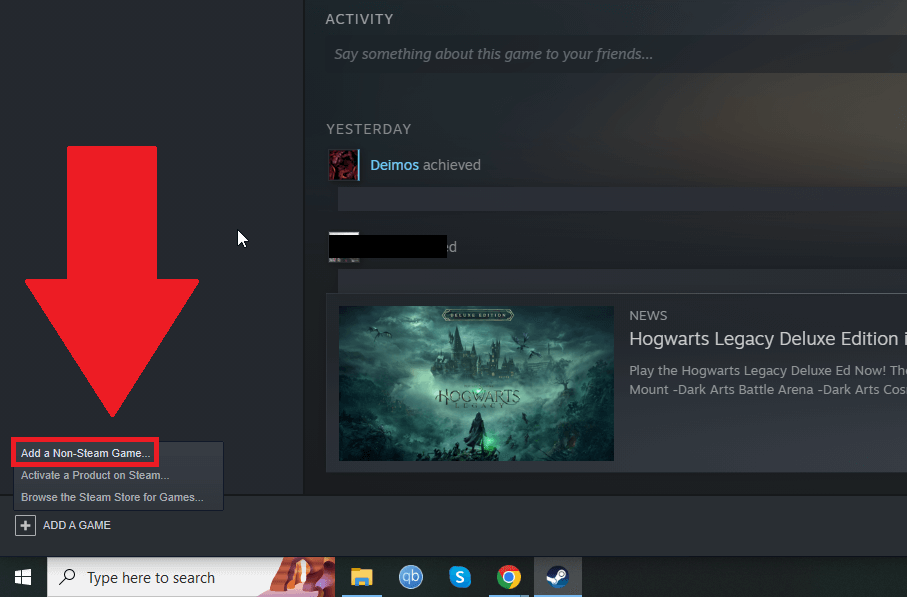
From the previous step, once you select “ADD A GAME“, a menu should pop up, and you’ll get three options:
- Add a Non-Steam Game…
- Activate a Product on Steam…
- Browse the Steam Store for Games…
If you don’t have all three options on your Steam Deck, don’t worry. The one you need – “Add a Non-Steam Game – will 100% be there.
Select it and see what’s next:
Step Three – Add Steam
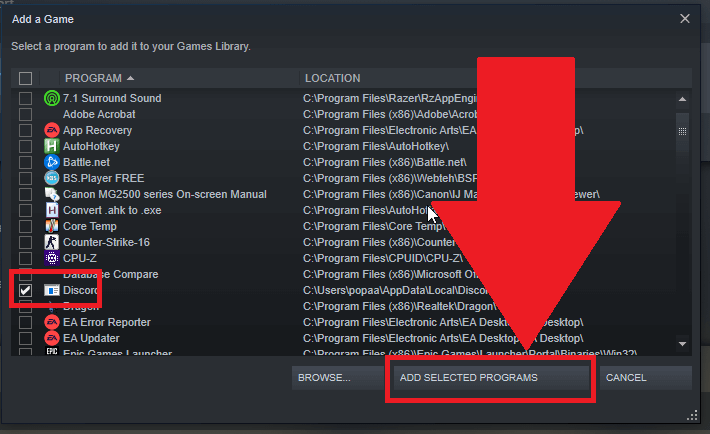
Once you complete the previous step (select “Add a Non-Steam Game“), a new window should appear (the one in the picture above).
You should see a list of all the apps and games you can add to Steam (my list is made up of all the apps on my computer).
Search for Discord, select it (check the box like in the picture above) and then select “ADD SELECTED PROGRAMS“.
Step Four – Open Discord from the steam list
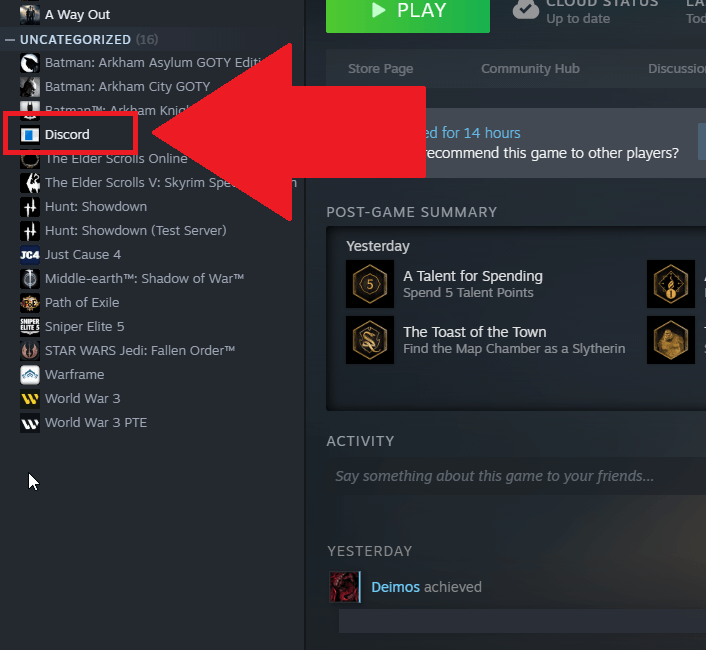
Last but not least, just make sure Discord has appeared in your game list by looking on the left-hand side. Or, depending on how Steam looks on your Steam Deck, look for the game list.
Now, open Discord from Steam directly. It should run normally, so just log in (if necessary), call your friends, and then see what’s next:
5. Switch Back to Gaming Mode on the Steam Deck
After adding Discord as a non-Steam game and running it from Steam, you can switch back to Gaming Mode and start your game.
Start a call with your friends on Discord, and you’re good to go!
That’s it—pretty simple, right?
It’s all about adding Discord as a game on Steam and running it from within Steam. Your Steam Deck will recognize Discord as just another game and will allow you to run it seamlessly.
If you have any questions or need further assistance, feel free to leave a comment below, and I’ll be happy to help!


