Is your Instagram recovery code not sending, or do you not have access to the mobile phone associated with that number? You can check out this guide I wrote on the topic.
But now, I’ll go one step further and assume you can’t get your recovery code at all and the solutions outlined in my other articles don’t work.
In that case, you’ll have to go through the support page, wait for a solution from the support team, log into your account, and either disable 2FA or get backup codes.
Don’t worry; I’ll walk you through all of the steps (screenshots included) to help you finish this quicker!
Ask Support to Help You
First, you should open the Instagram app on your phone and try to log in. You should end up at the security code window, where you’ll be asked for the 6-digit code.
Follow the steps below to fix this:
1. Select “Try another way“
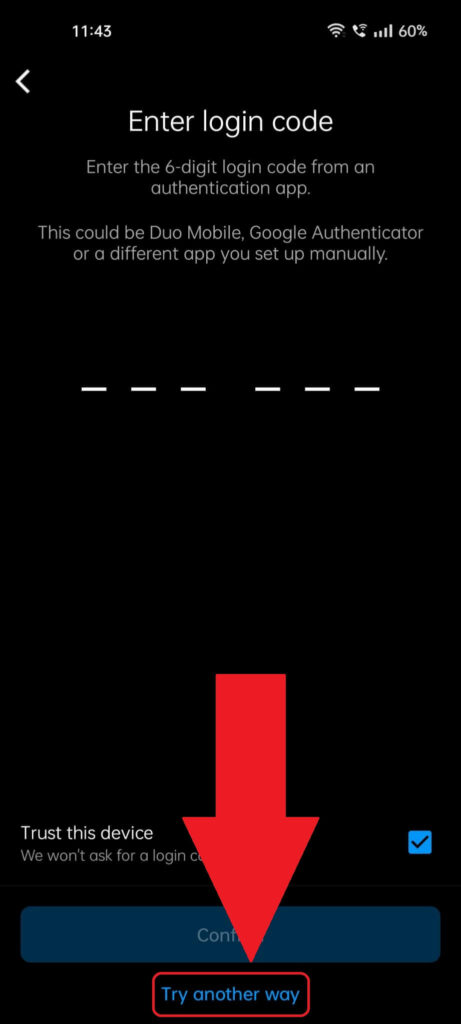
As you can see, the “Enter login code” page will ask you for the 6-digit code from the authenticator code (or from the SMS). But you can’t access those.
So, you’ll have to use another method, which means selecting the “Try another way” option at the bottom of the page. See the picture above for more visual cues!
2. Select “Get support“
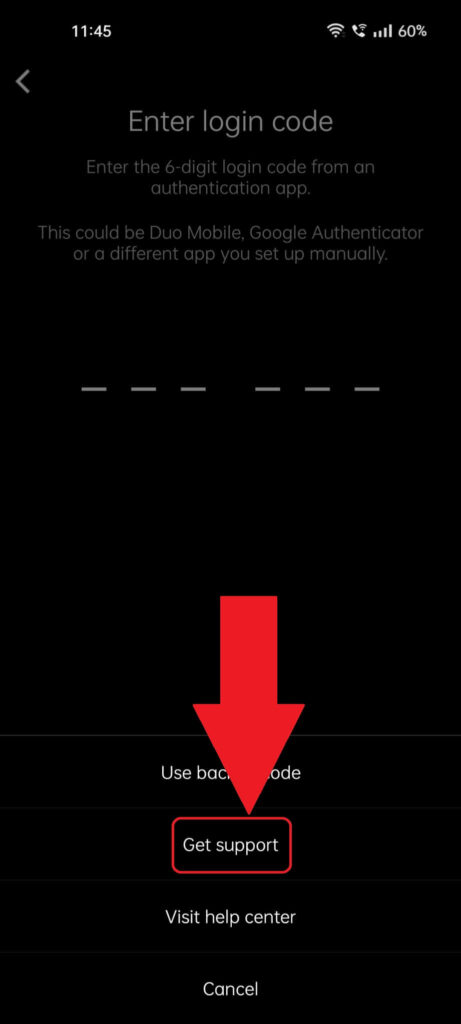
Next, a pop-up menu should appear once you select “Try another way” during the previous step. This menu will contain three options:
- Use back-up codes
- Get support
- Visit help center
I’m going to assume that you don’t have your backup codes. If you did, you wouldn’t be reading this.
As for the Help Center, don’t even bother. It’s completely useless and a waste of your time – they can’t help you with general info.
Instead, you need the “Get support” option, so select it and keep reading!
3. Check the “Yes, take a selfie video to confirm my account” option
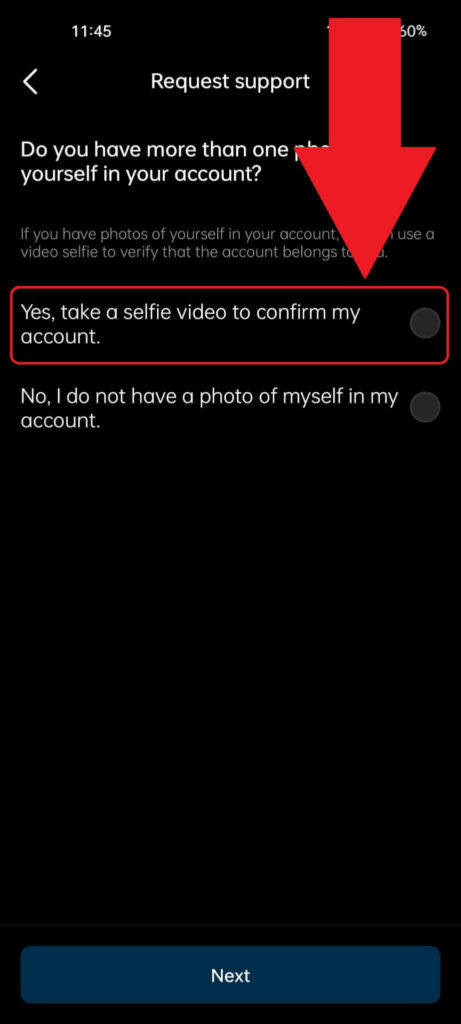
On this next page (the one you see above), you’ll be provided with two options to regain access to your account:
- Either take a selfie video (or provide a selfie photo of yourself)
- Or don’t do that and consult the Help Center (which is useless)
Naturally, I recommend using the first option – “Yes, take a selfie video to confirm my account“. You won’t need that video/photo now, so don’t worry.
Just select it and see the next steps below!
4. Enter your email address
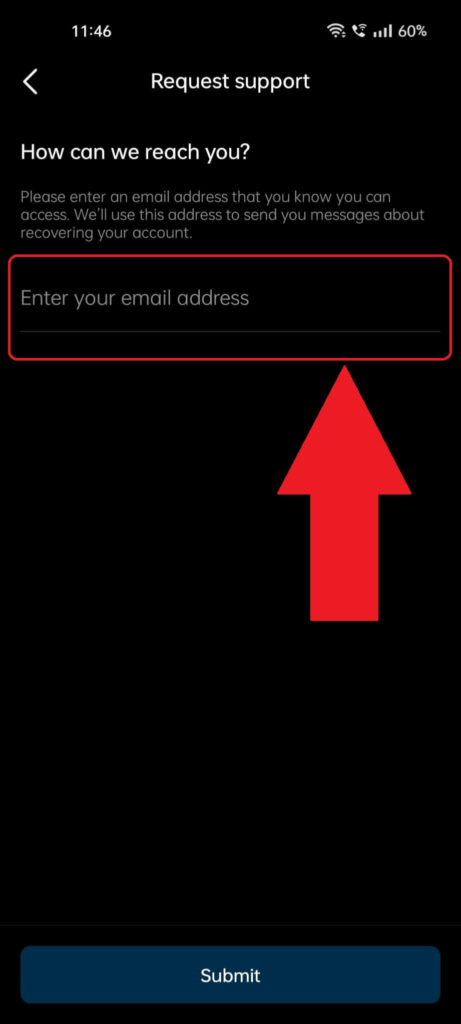
Lastly, you’ll be taken to a page requiring you to enter an email address that Instagram support can contact you on.
It doesn’t have to be the email account associated with your account, but it you have access to that one, use it. It’ll help your case big time!
Now, you’ll have to wait for Instagram to send you instructions on your email address. Maybe they’ll ask for a selfie from you, an ID, or any other identification method.
Wait for that email, go through their instructions, and regain access to your account. Once you do that, I recommend disabling 2FA or getting new backup codes.
Follow the next steps to do that:
5. Tap on your profile picture in the bottom-right corner

Assuming you’ve already regained access to your Instagram account, it’s time to deal with the 2FA feature. Go to your profile page first – tap the profile picture in the bottom-right corner to do that.
6. Tap the three-line icon
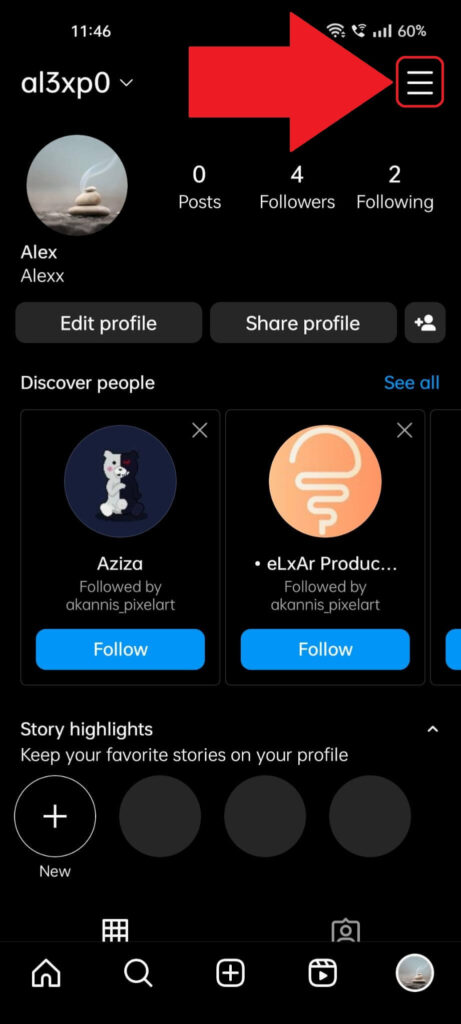
This is your profile page which I’m sure you’re familiar with. The Instagram settings – that’s what you need now, so select the three-line icon in the top-right corner.
That’ll open a menu at the bottom of the page. Keep reading to see what’s next!
7. Select “Settings”
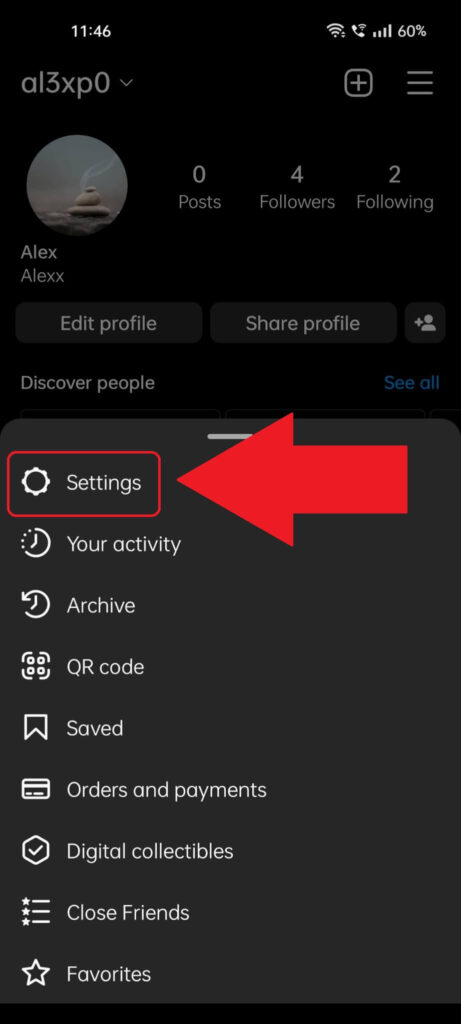
This is the menu I mentioned during the previous step. It appears once you tap the three-line icon in the top-right corner.
Inside, you’ll find multiple options, but the one you need is first on the list – “Settings“. Select it and keep following my instructions 😀
8. Select “Security“
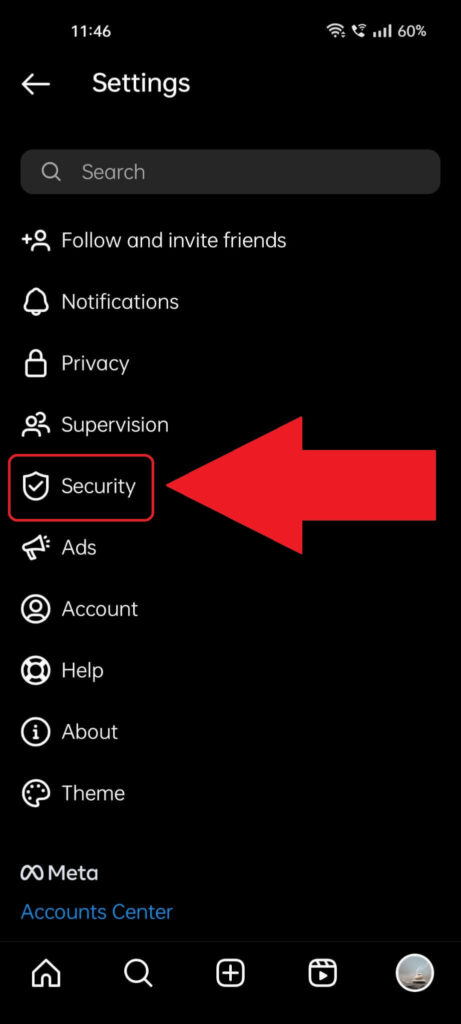
Once you open the settings page (by following the previous step), you should see a list of options barreling down, including:
- Notifications
- Privacy
- Supervision
- Security
- Ads
- Etc…
“Security” is the option you’re looking for, of course. Select it now, please!
9. Select “Two-factor authentication“

Inside the security settings, which you can see in the picture above, you’ll see the “Two-factor authentication” option right away. It’s under the “Saved login info” option and is also highlighted above.
Select it and keep reading my next instructions!
10. Select “Authentication app“
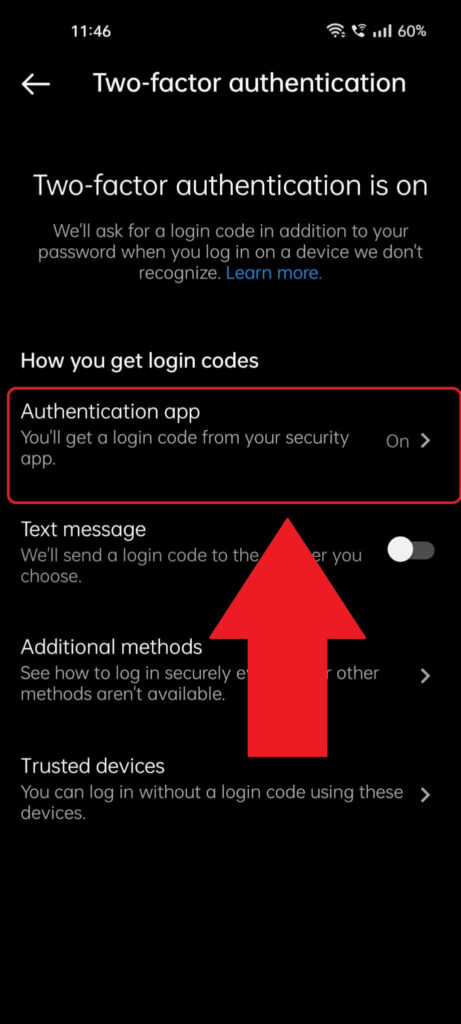
Next, the “Two-factor authentication” page will provide specific settings about the method through which you use 2FA when logging in (either through SMS or an app).
In my case, I’ve been using Google Authenticator, so I’ll choose the “Authentication app” option to disable it. If you’re using SMS messages, choose that.
11. Disable 2FA
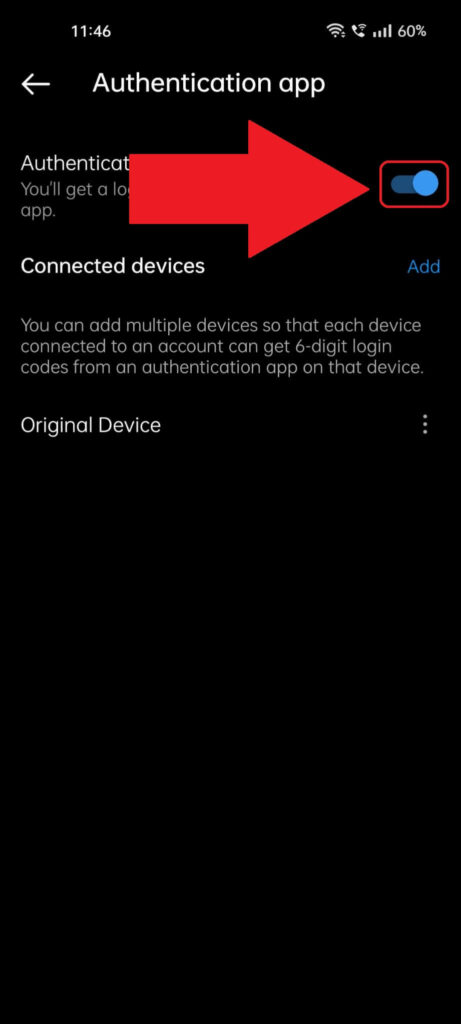
On the “Authentication app” page, you should see an option named “Authentication app” or something like that. Next to it, on the right, you’ll see a blue marker.
Tap that to make it grey and disable 2FA. If you’re using SMS messages, the same principles should apply, so disable everything you see.
Now, we’re technically done, but what about if you don’t want to disable 2FA? In that case, you’ll need to get new backup codes to log in when you can’t access your authenticator app or phone to get the SMS message.
That’s a way to avoid your current situation when you don’t have access to the recovery code. Follow the steps below!
12. Select “Additional methods“
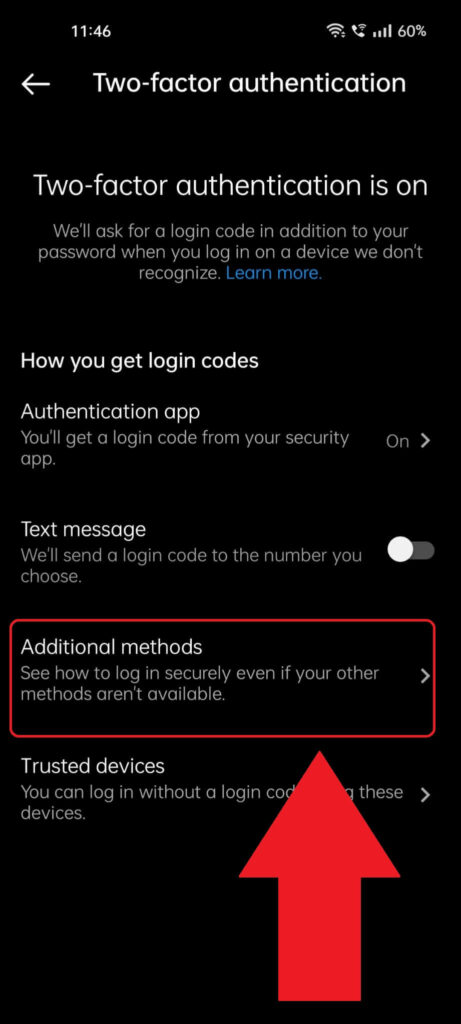
To do this, return to the page from step 10, the “Two-factor authentication” page, and select “Additional methods” instead.
13. Select “Get new codes“
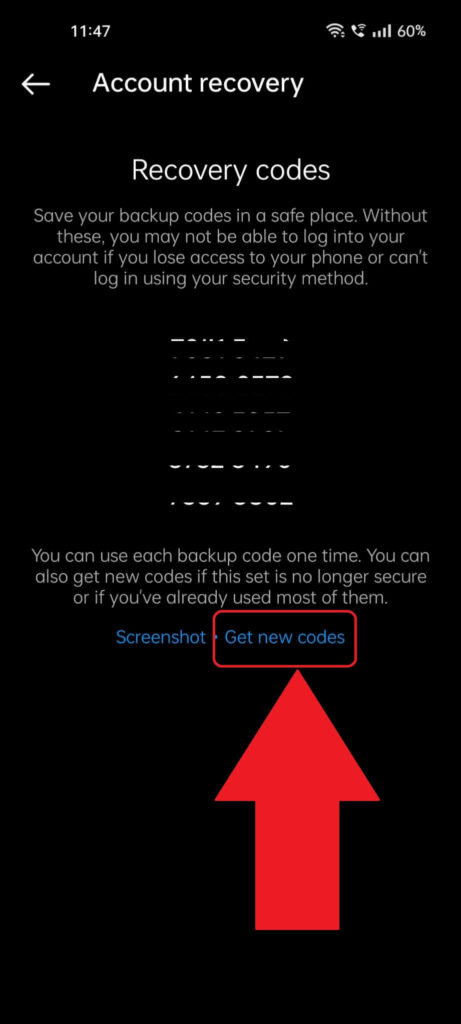
This is it – on this page, you should see your current recovery codes, but I recommend changing them. Select “Get new codes” at the bottom of the page (highlighted in the picture above) and wait for new codes to pop up.
Save them in your gallery or jot them down in a notebook, and you’re done. Next time you can use these backup codes if you don’t have access to your authentication app or phone.
I hope this guide helped you regain access to your Instagram account despite not having your recovery codes.
If you have any issues or you’re still trying to recover your account, let me know in the comments below. Maybe I’ll be able to help you!