Have you decided to use CapCut to edit your videos for TikTok or other social media channels? While it’s not difficult to use, CapCut has many features.
This might confuse you at first but don’t worry!
This guide will tell you everything you need to know about CapCut and how to edit videos. I’ll also explain every feature and option, how you can use them, and what they do.
Some of these features are:
- Split
- Trim
- Rotate
- Resize
- Add audio
- Crop
- Change volume
- Change speed
And many more. This will be a comprehensive guide, so buckle up. Keep reading to learn more about CapCut and how to use it professionally!
Summary: CapCut is a versatile and user-friendly video editing app, perfect for creating content for TikTok and other social media platforms.

Comprehensive Guide to CapCut Features:

1. Basic Editing Tools:
   - Splitting: Cut your video into segments to remove unwanted parts or rearrange clips.
   - Trimming: Shorten your video by adjusting the start and end points.
   - Rotating: Change the orientation of your video.
   - Resizing: Adjust the video dimensions to fit different social media formats.
   - Adding Audio: Incorporate music or voiceovers to enhance your video.

2. Advanced Editing Options:
   - Green Screen: Use the green screen feature to replace backgrounds and create dynamic scenes. Select "Chroma Key," pick the green color with the "Color Picker," and adjust the intensity.
   - Slow-Motion Effects: Add slow-motion effects to highlight key moments in your video.

Hidden Features and Tips:
- Transitions: Smoothly switch between clips with various transition effects.
- Filters and Effects: Enhance your video with a wide range of filters and effects.
- Text and Stickers: Add text, stickers, and animations to make your video more engaging.
- Speed Control: Adjust the speed of your clips for dramatic effects.

Sharing Your Videos:

- Once your video is edited, export it in the desired resolution and share it directly to your preferred social media platform.

By following these steps and exploring CapCut's features, you’ll be able to create professional-looking videos that are ready to impress on any social media platform.

Start CapCut and Add a New Video
Follow the steps below to start CapCut and add a new video to edit:
1. Tap on “Accept“
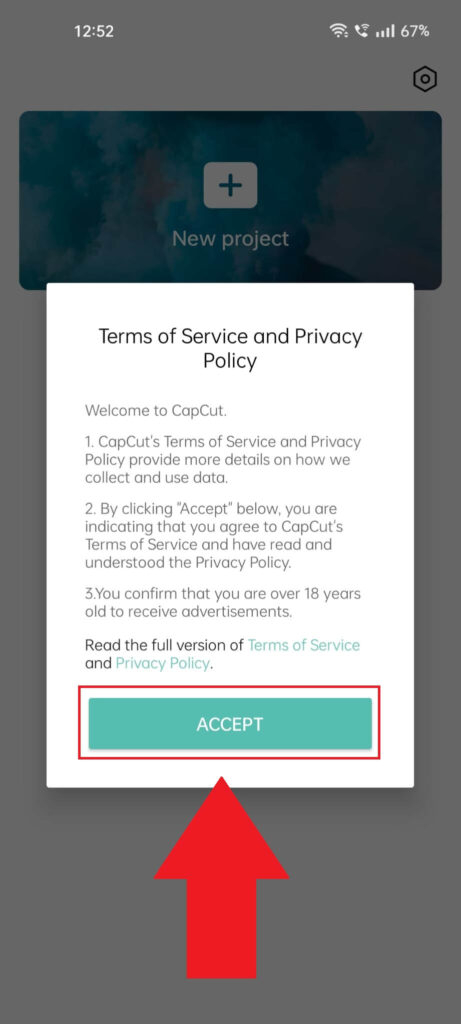
The first step is opening CapCut from your app list. Once you do that, you’ll be welcomed by the Terms of Service and Privacy Policy notification.
Tap on “Accept” to accept the ToS and Privacy Policy. This will unlock the CapCut app for you!
2. Tap on “New Project“
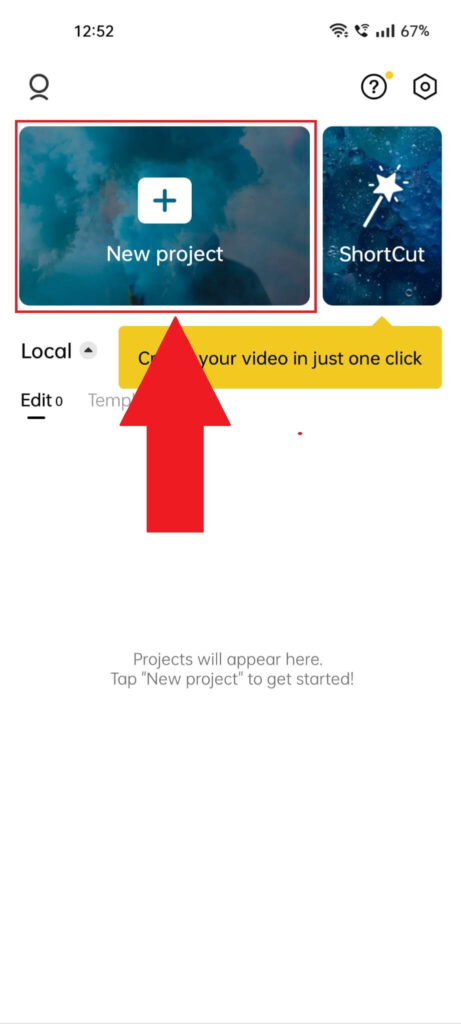
Once you get rid of the ToS notification, you’ll end up on the main CapCut window. Tap on “New Project” to be uploading a new video to edit.
3. Select “Allow“
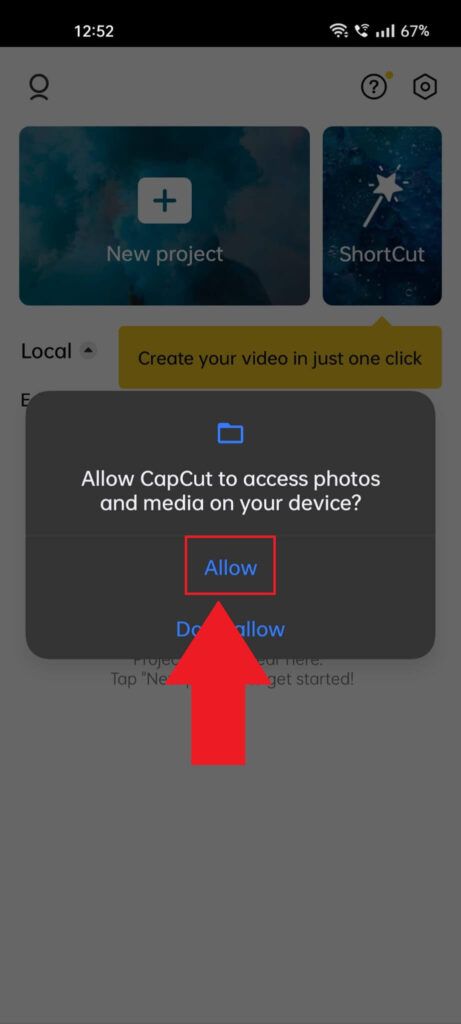
Once you select “New Project“, a notification window will appear, asking you to allow CapCut access to your photos and media.
Select “Allow” and move on.
4. Select a video
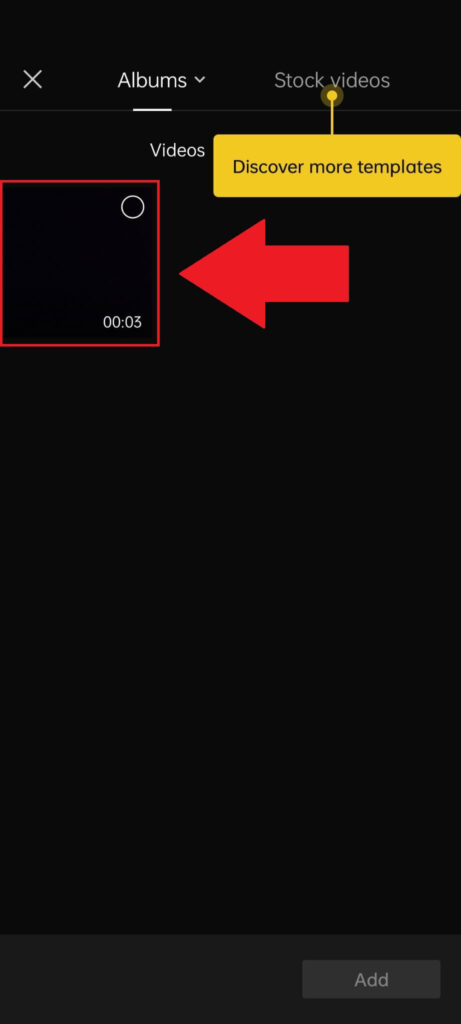
In this window, you’ll need to select a video you want to edit. All the videos you create with your phone camera will be in the “Albums” folder.
You can also use stock videos by going to the “Stock videos” menu in the top-right corner of the screen.
5. Select “Add“
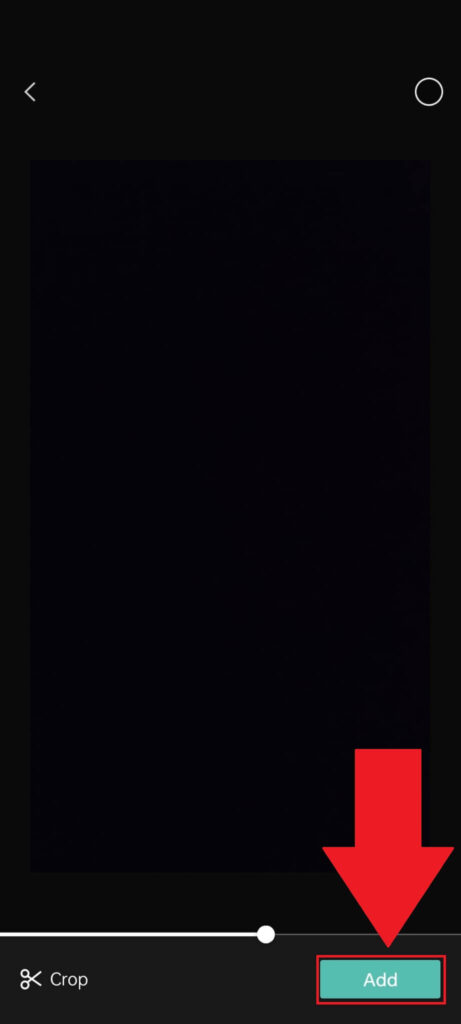
Once you choose a video, you’ll be given the option to crop it if you want to. Tap on the button in the bottom-left corner to do that.
If you don’t want to crop the video, select “Add” in the bottom-right corner.
CapCut Main Features
Once you select a new video to edit, you’ll be taken to the editing screen. Follow the guide below to see what features you have at your disposal and what they do:
1. Effects

The first CapCut editing option you can use is the “Effects“, from right to left. Tap on it to open another window with two options – “Video effects” and “Body effects“
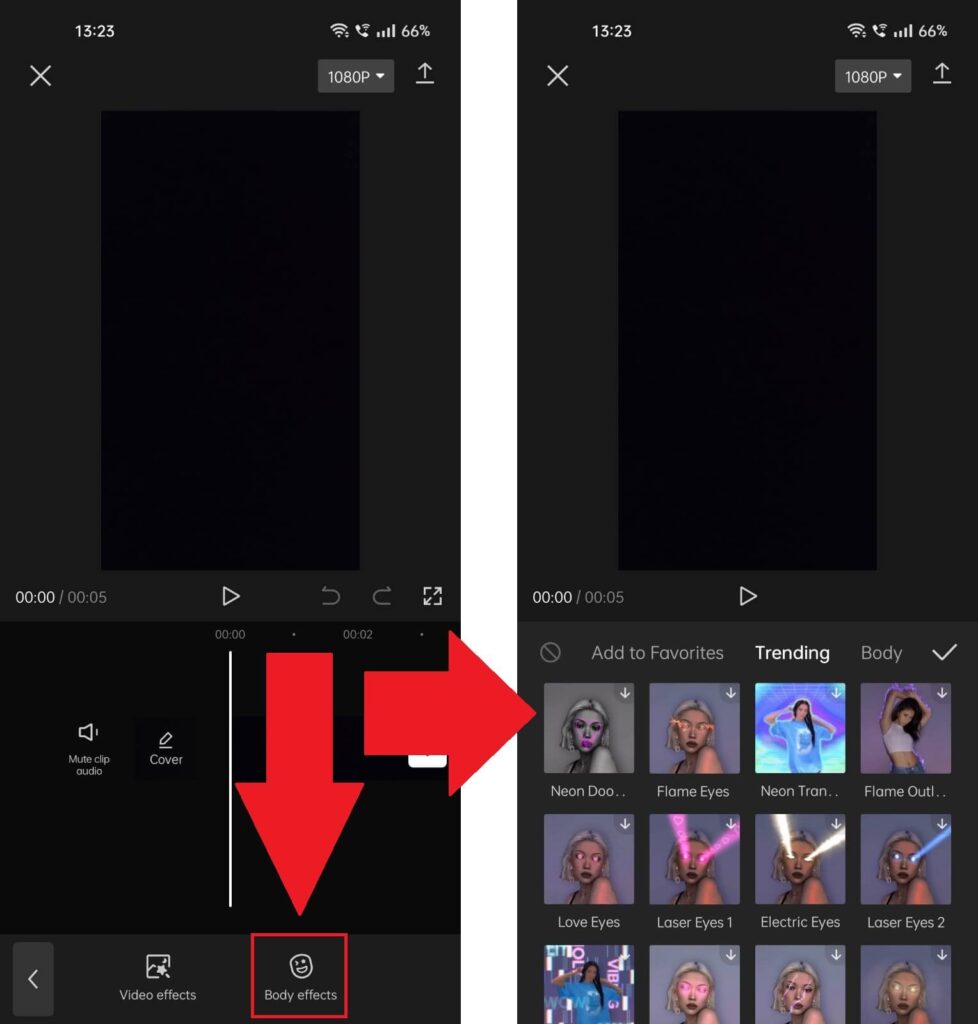
Tap on “Body effects” and you’ll see all types of body effects you can use for your video if there’s a person in the video.
You can scroll through various menus and find the right body effect. Select it, and CapCut will apply it.
Go back to the previous screen and select “Video effects“
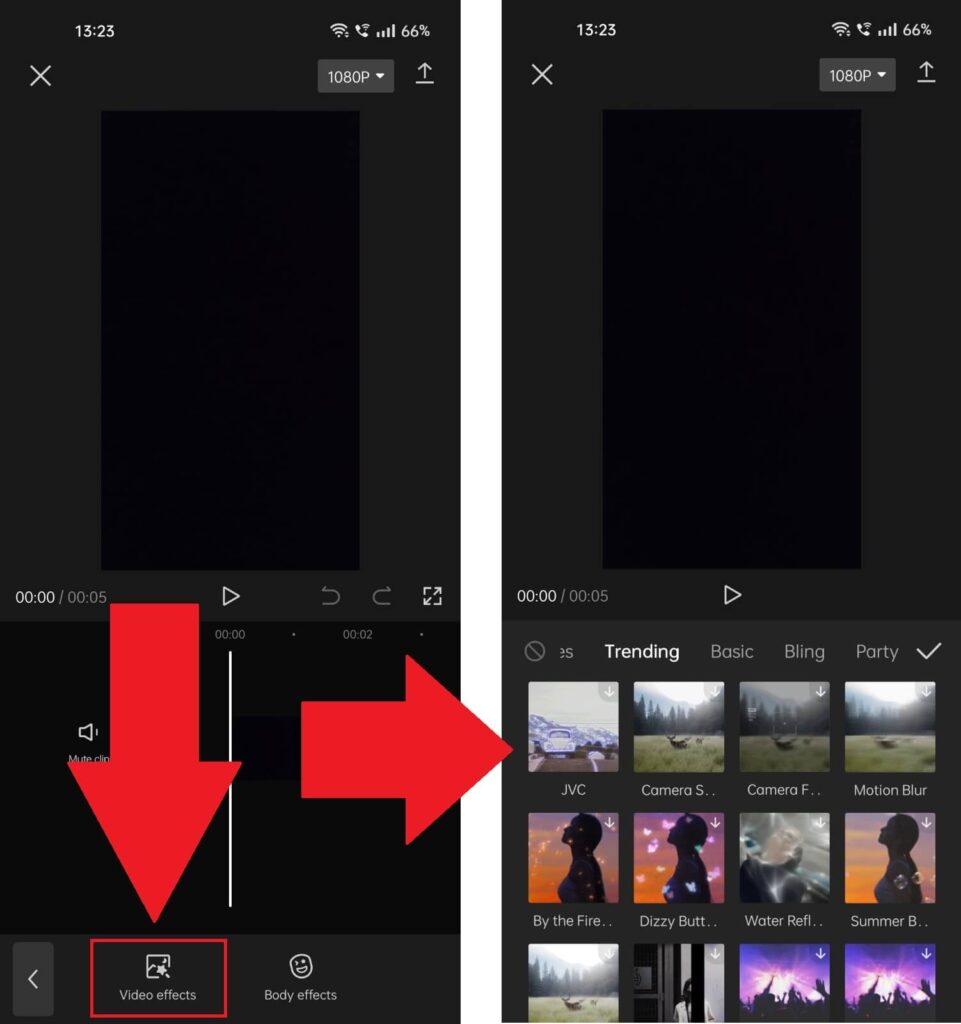
In the “Video effects” screen, you’ll find effects that impact the video itself. Go through the options, select an effect you like, and tap on it. This will apply to your video.
2. Overlay
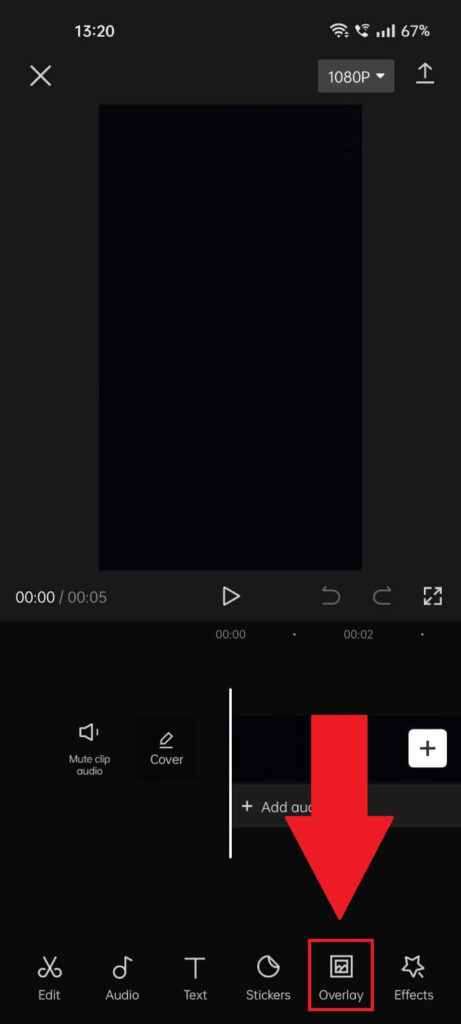
The Overlay allows you to add certain textures and colors or combine other images with your videos. Think of it as adding an image that wasn’t originally in the video.
This lets you achieve meme-related videos with images that pop up in the middle of a video, for instance.
3. Stickers
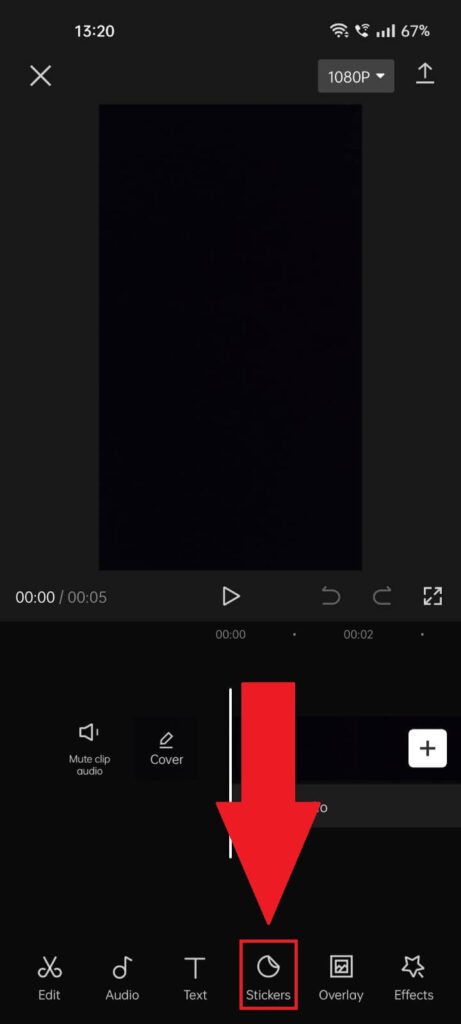
The next base feature you need to know about is “Stickers“. Tap on it to reveal other options hidden beneath.
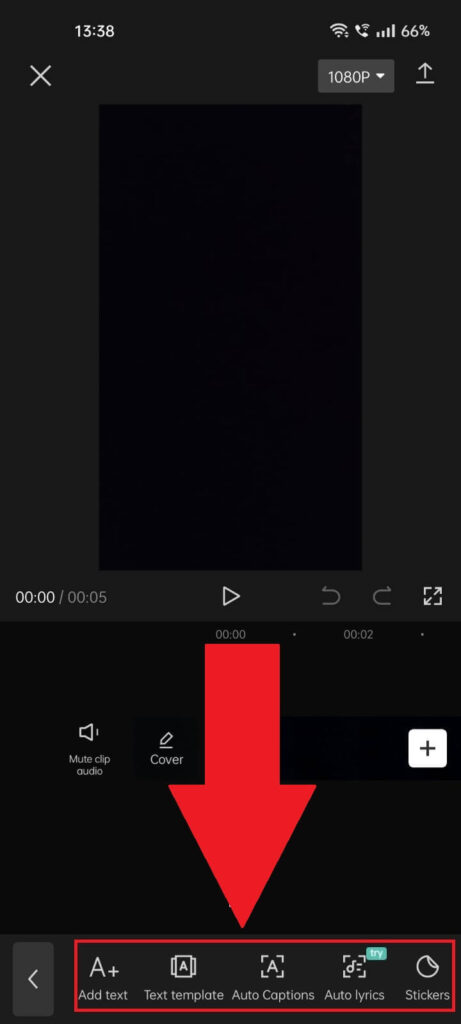
In the “Stickers” menu, you’ll find the following options:
- “Add text” lets you add an overlay text anywhere in the video. The text will remain on screen during the entire duration of the video
- “Text template” – This lets you add a certain design to the text you add over the video
- “Auto captions” – This lets you add subtitles to your video
- “Auto lyrics” – This lets you create lyrics for your song videos
- “Stickers” – This lets you add stickers anywhere in the video
- “Draw” – This lets you draw anything, anywhere in the video
4. Text
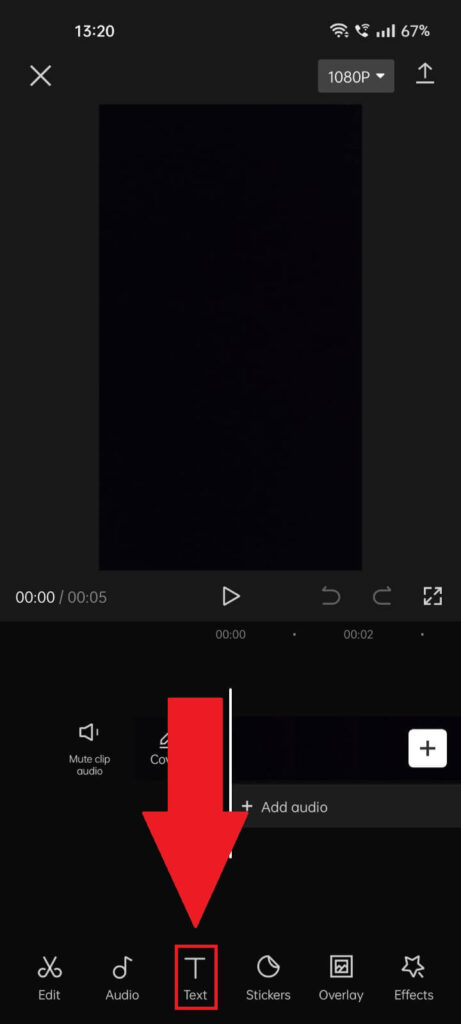
The “Text” option will open up the same options as the “Stickers” option. Read above to see what those options do.
5. Audio
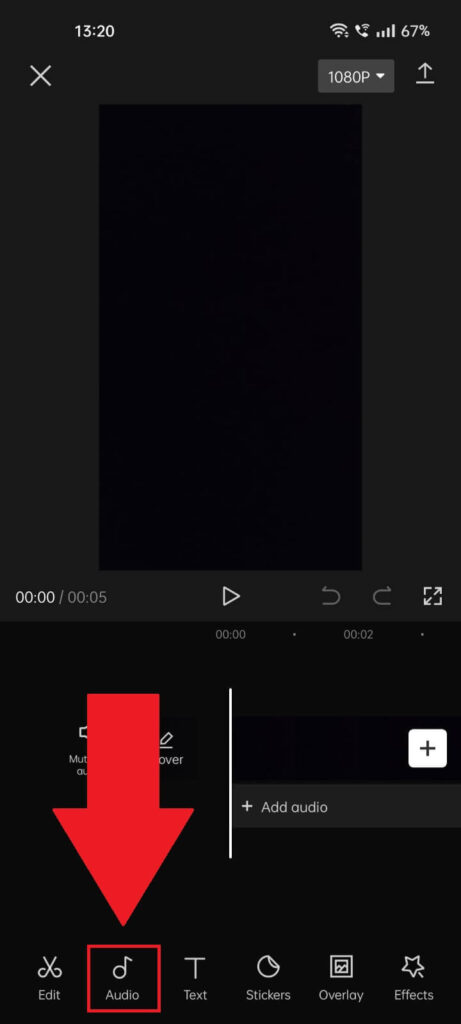
The next base feature on CapCut is “Audio“. Tap on it to switch the interface to reveal other audio-related options.
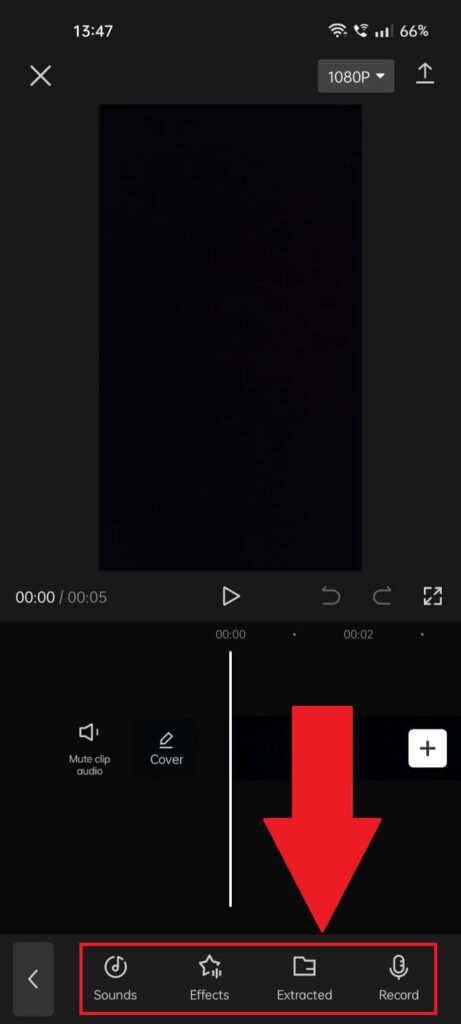
After you select “Audio“, you’ll see these options. Here’s what each of them does:
- “Sounds” – It lets you add sounds on top of the video, like music
- “Effects” – This lets you add sound effects like “Whistling” or “Laughter” or “Explos1on” over your video
- “Extracted” – This lets you extract a sound from an imported video so you can use it on your video
- “Record” – This lets you a voiceover or other sounds to add to your video
Advanced Features
To access the advanced features of CapCut, select any part of the video or the video itself, or tap “Edit” on the bar at the bottom of the screen.
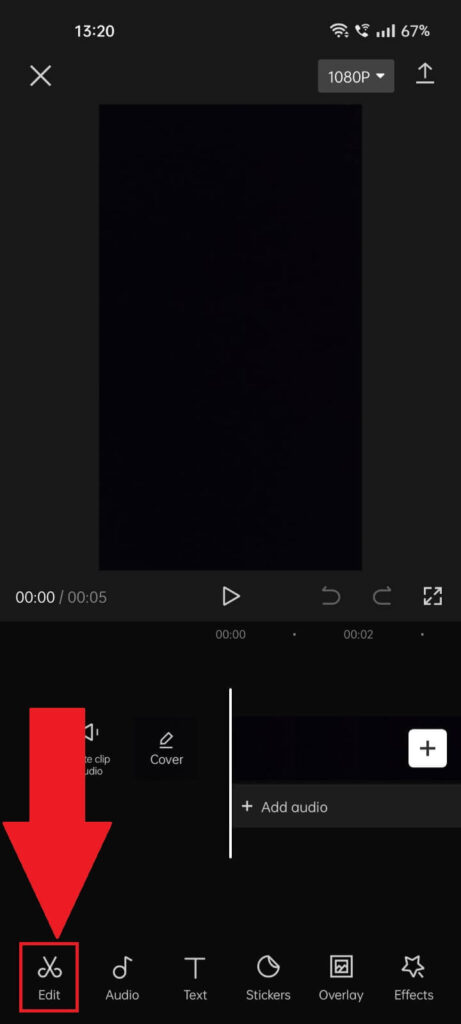
The last basic feature on CapCut is the “Edit” feature, leading to other options I’ll need to detail. Have a look at the picture below.
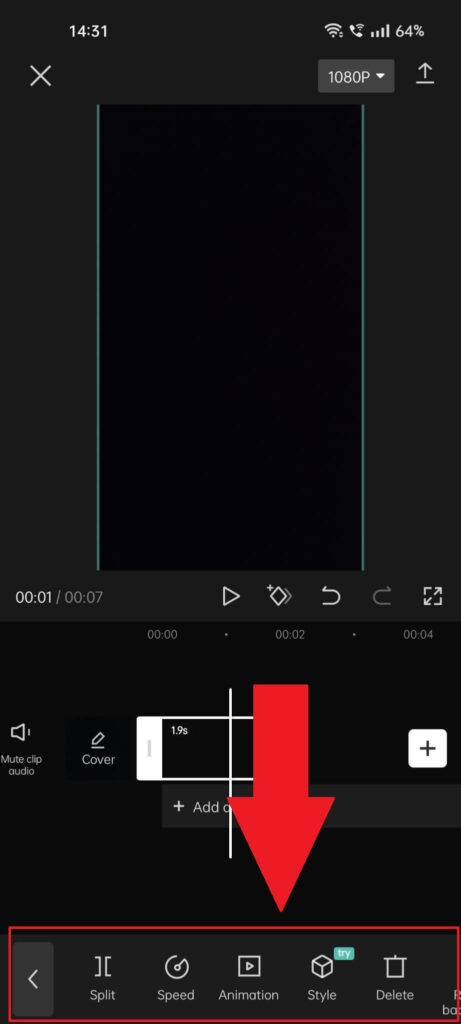
Once you tap “Edit,” a suite of options will appear on the bottom menu. They are:
- “Split” – This lets you split the video into multiple segments so you can edit them individually
- “Speed” – This lets you adjust the speed of the video, including the speed of multiple split segments of the video
- “Animation” – You have three options here: “In“, “Out“, and “Combo”. Select them to find different types of animation you can apply to your video
- “Style” – A more advanced type of animation that effects special effects on particular parts of the video
- “Delete” – This lets you delete the video or a split segment of the video
- “Remove background” – You can remove the background of the video and only keep certain portions of the video
- “Volume” – It lets you adjust the volume of the sound in the video
- “Extract audio” – It lets you extract the audio from another video and place it in this one
- “Edit” – Here, you have three options: “Rotate”, which lets you rotate the video, “Mirror”, which lets you mirror the video; and “Crop”, which lets you crop the video
- “Filters” – You can add video filters to change the overall look of the video
- “Adjust” – Here, you can tweak the Brightness, Contrast, Exposure, Sharpness, Saturation, HSL, Graphs, Highlight, Shadow, Temp, Hue, Fade, Vignette, and Grain
- “Enhance” – You can enhance the Face, Body and Reshape the body of a person in the video
- “Mask” – You can mask certain parts of the videos and retain only what you want
- “Overlay” – This lets you add an overlay, another video layer on top of the existing video, and you can edit the overlay using the same settings
- “Replace” – You can replace the current video with another one from your album
- “Stabilize” – You can stabilize a shaky video by cropping some of the corners
- “Opacity” – It lets you control the opacity of the video
- “Voice effects” – It lets you add voice effects on the voice in the video, like Synth, Bass, Retro, Funny, etc
- “Copy” – Lets you copy a segment of the video
- “Reverse” – Let’s you play a video from the end to the beginning, reversing it.
- “Freeze” – Lets you freeze a video at a certain point in time
- “Graphs” – Graphs let you customize transitions between keyframes
These options will let you customize and personalize your video how you want to. While CapCut is not as advanced as other video editors, it’s more than enough for casual users.
How Can I Select Specific Parts of the Video?
In CapCut, if your video is split into multiple parts, you can select every individual part and edit it accordingly.
Follow the steps below to select multiple parts of a video:
1. Tap on a video segment to select it
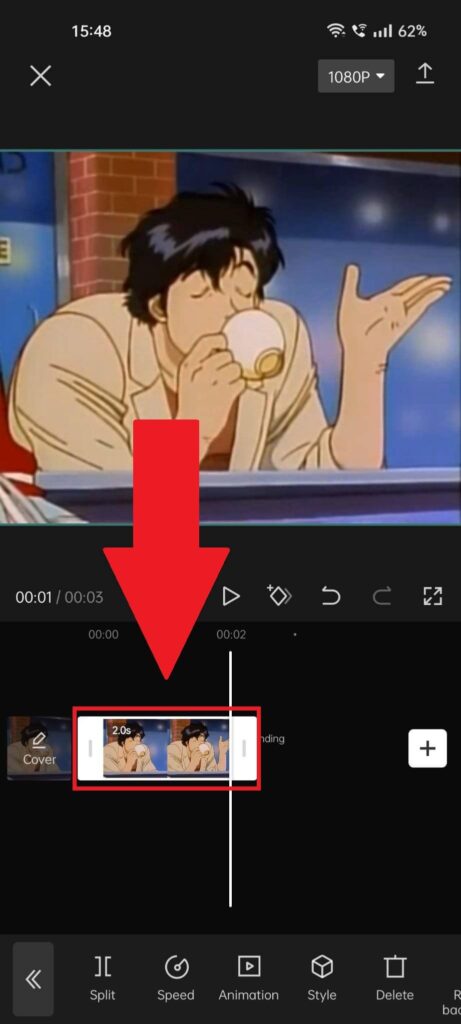
Do you see that the video sequence is barred on both sides by two white markers? Everything between those white markers is a video segment.
If you can see those white markers, it means you’ve selected a video segment. Those white segments indicate how long the video segment is.
But you may have other segments in your video. For instance, in the picture above, there’s another video segment to the right.
2. Select another video segment
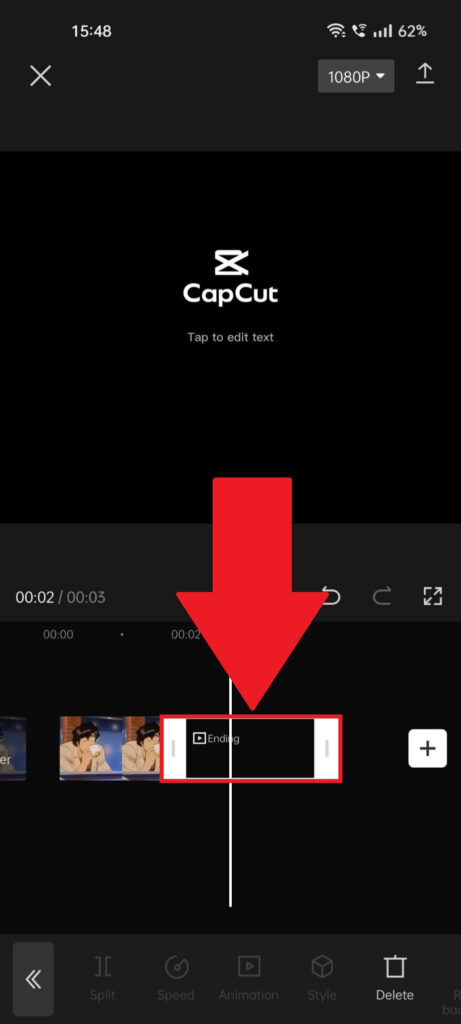
As you can see, this is the second video segment, the default CapCut ending screen after your video ends. You can choose to remove this or edit it.
Or you can add another video sequence after the first one. And you can select every video segment by tapping on it.
Special Hidden Features on CapCut
CapCut has a few hidden features that are achieved using certain normal features. Here are some of those features:
- Slow motion: With the “Speed” option, you can make your entire video run slow by decreasing the “Speed” meter.
- Fast motion: The same as above, only that you increase the “Speed” meter to create a fast-moving video
- Zoom-in and zoom-out effects: Using the “Keyframes” function, you can simulate zoom-in and zoom-out effects in your videos
- Green screen: For this, you’ll need to download a greenscreen video. Then, add it to your CapCut video as an “Overlay“, and start playing around with it
There are just some of the special hidden effects you can obtain by cleverly using CapCut. Others are out there, but you’ll need to discover them yourself!
How Can I Share a CapCut Video?
Are you done editing your CapCut video, and now you want to share it? Follow the steps below to share your CapCut video in two easy steps:
1. Tap on the “Download” icon

Once you finish editing your video and want to share it, tap on the “Download” icon in the top-right corner of the screen.
Make sure you select your preferred quality from the Quality button to the left of the “Download” icon first.
2. Share it on social media
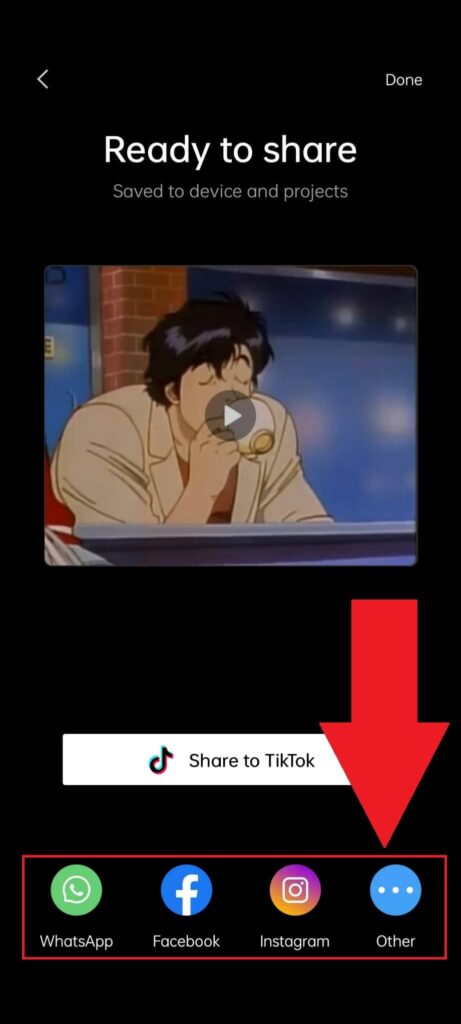
Once the video finishes loading up, you can share it on social media like WhatsApp, Facebook, Instagram, and others.
CapCut lets you share directly with TikTok since this app was initially designed to edit and share TikTok videos.
After selecting one option, continue with the outlined steps to finish sharing the video on a social platform.
Conclusion
To summarize, CapCut is a wonderful video editing app with plenty of features that let you customize your video for social media.
It’s one of the most popular video editing software for many socialites, especially TikTokers. This guide should help you understand how to use its features best to create a great video!
If you’re confused about CapCut’s features, don’t hesitate to comment below. I’ll reply as soon as possible.
Stay tuned for other informative articles on CapCut!
Is the CapCut video editor free?
Yes, CapCut is entirely free. You can use 100% of its features once you download it for Android or iOS.
The app also has no ads and no paywall for certain features. What you see is what you get.
CapCut is free because it’s made by ByteDance, the parent company of TikTok.
It was originally made as an editing software for TikTok videos, but over time, they’ve added the option to share CapCut videos to other social media channels.
It’s unlikely that CapCut will ever become premium or have features locked behind a paywall.
After all, most of its features are basic and don’t provide anything too special. There is other video editing software that is much better than CapCut.
What are the advantages and disadvantages of CapCut?
First, CapCut is not the best video editing software, but its free makes it highly competitive.
Below is a list of pros and cons for CapCut!
Pros:
– Plenty of templates to use
It- Easy to export videos and share them on social media
– Available in more than 20 languages
– User-friendly interface
– Trendy filters, transitions, and effects
It- Very convenient and easy to use
– Cool music and sound library
Cons:
– App is limited by your device’s RAM and hardware
– Not available on computers
– Does not support landscape mode for smartphones
– Can’t set frame rate above 60 FPS
– Some features are not accurate and may suffer glitches
– Does not have advanced color grading tools
– Videos you export have the CapCut watermark on them
CapCut is a good enough video editing tool depending on how casual or professional you want the video to be.
CapCut is free, intuitive, and quite flexible, but it falls far behind other professional video editing tools.
What information does CapCut collect?
Because CapCut is owned by the same company that owns TikTok, they almost have the same Privacy Policies.
Here’s what type of data CapCut collects in connection to TikTok:
– Date of birth, gender, email address, and password when you register an account
– Your accounts on other social media networks if you use them through CapCut
– Photos, videos, images, and video templates that you upload, generate or view through the app
– Comments and likes you take on the platform
– Identifiable information found in your videos, including scenery, furniture, faces, etc
– IP address
– Unique device identifiers
– Advertising identifiers
– Network type and connections
– Mobile or device model
– System language and region
– Battery information
– CPU and GPU information
– Device resolution
– Mobile phone area
– Device manufacturer
– What videos do you watch and like
– Information about your followers
– The transcribed and edited text created through the “Auto Caption” function
If you share videos to TikTok via CapCut, they will know what videos you’ve shared and how you edited them.
Moreover, CapCut has access to the files on your phone, including images, videos, and so on.
While CapCut is safe to use because ByteDance manages it, TikTok’s mother company, you may not like how much data it collects about you.
Is there any app similar to CapCut?
Yes, there are plenty of alternatives to CapCut. If you don’t like TikTok’s video editing app, then you can try one of the following apps:
– FlexClip: It has an intuitive interface, ready-made templates, versatile media resources, and great effects, and it’s also available for computers;
– Animoto: Friendly interface, a wide range of music tracks, it’s compatible with many devices, it has many video templates and slideshows, there’s no installation required, and it’s intuitive;
– Biteable: This is a web-based video editor that has multiple animations, footage, and cartoon templates, and it’s mainly used for making ads for businesses;
– Veed.io: Uncluttered UI, great tools, many video formats, pre-designed templates, and great video effects;
– Filmr: Smooth transitions between videos, no limit on how many images/videos you can upload, multiple fonts, intuitive interface, 20+ million royalty-free music tracks, exclusive filters;
– Quik: Multiple transitions, effects, beat-synced themes, automatic editing, and manual fine-tuning, compatible with motion photos;
Other mobile video editing apps are FilmoraGo, KineMaster, VivaVideo, WeVideo, VideoShow, Magisto, InShot, and PowerDirector.
Most of these alternatives come with a free and premium plan, however. Depending on your needs, the free plan may not be sufficient for your video editing requirements.
Do your research and see which app serves you best!