Velocity edits are one of the most impressive things you can do on CapCut. Pure cinematography at its finest… Interested in learning how to do them yourself?
Then, follow my instructions:
- Create a new project and select a video
- Go to the “Edit” option in the bottom-left corner
- Select “Speed“
- Select “Curve“
- Select “Custom” and click on “Edit“
- Adjust the velocity points up and down
- Add or remove velocity points
- Save the changes
Below, you’ll find a detailed step-by-step guide on making velocity edits with screenshots to help you out!
Summary: Velocity edits on CapCut add an impressive, dynamic effect to your videos. This step-by-step guide teaches you how to create a velocity edit by adjusting the speed of specific segments in a video.

Step-by-Step Guide to Creating Velocity Edits on CapCut:

1. Create a New Project:
   - Open CapCut and start a new project by selecting the video you want to edit.

2. Select the "Speed" Option:
   - Tap on the video clip in the timeline to highlight it.
   - Choose the "Speed" option from the toolbar.

3. Choose the "Curve" Option:
   - In the speed settings, select the "Curve" option.

4. Use the "Custom" Settings:
   - Choose the "Custom" setting to manually adjust velocity points.
   - Add points along the curve to change the speed of specific segments of your video.

5. Adjust Velocity Points:
   - Drag the points up or down to increase or decrease the speed at different segments.
   - Experiment with the points until you achieve the desired dynamic effect.

6. Save Your Changes:
   - Once satisfied with the velocity adjustments, save your changes.

Adding a Flash Effect:

1. Add a New Overlay:
   - Tap on the overlay option and select a white or bright-colored image.

2. Adjust the Overlay:
   - Place the overlay at the points where you want the flash effect to occur.
   - Adjust the duration to make it quick and impactful.

3. Set the Opacity:
   - Reduce the opacity of the overlay to blend it smoothly with the video.

Final Steps:

- Preview Your Edit: Watch the video to ensure the velocity edits and flash effects are smooth and effective.
- Export the Video: Save and export your video in the desired resolution.

By following these steps and experimenting with different settings, you can create eye-catching velocity edits on CapCut.

1. Select “New Project“
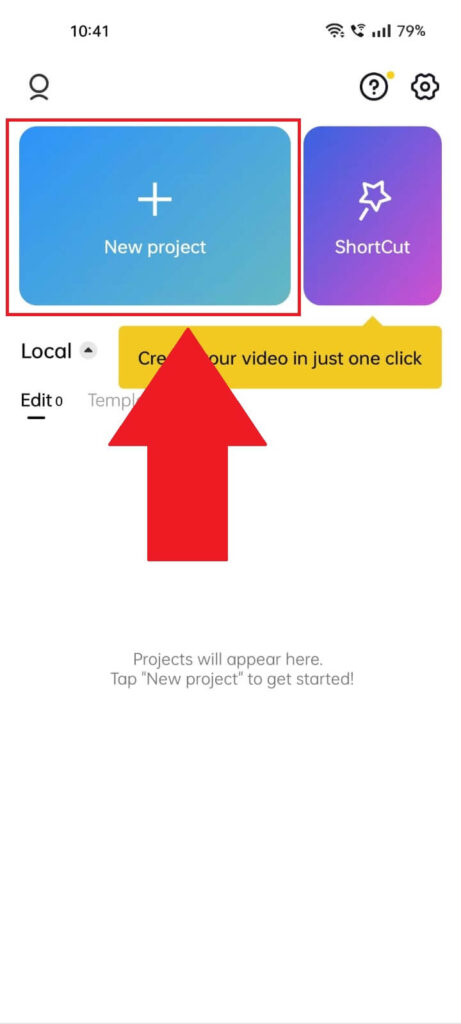
Begin by opening CapCut and uploading a new video (select “New project” in the top-left corner).
2. Select the video you want to edit
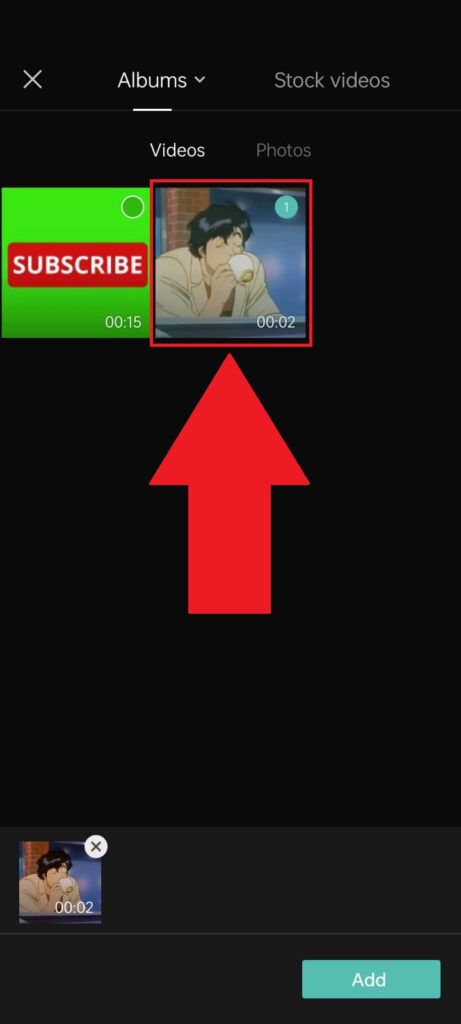
Once you get to the “Albums” page, select a video you want to edit and then tap “Add” in the bottom-right corner. See the picture above for more details!
3. Tap on “Edit“
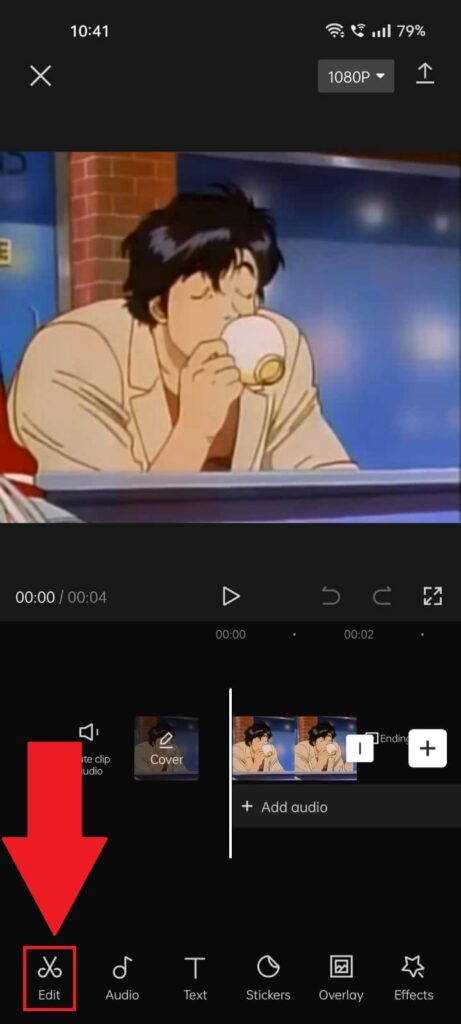
After selecting the video, you’ll be redirected to the edit screen. But you’ll need a deeper layer of editing for this, so select the “Edit” button in the bottom-left corner.
4. Tap on “Speed“
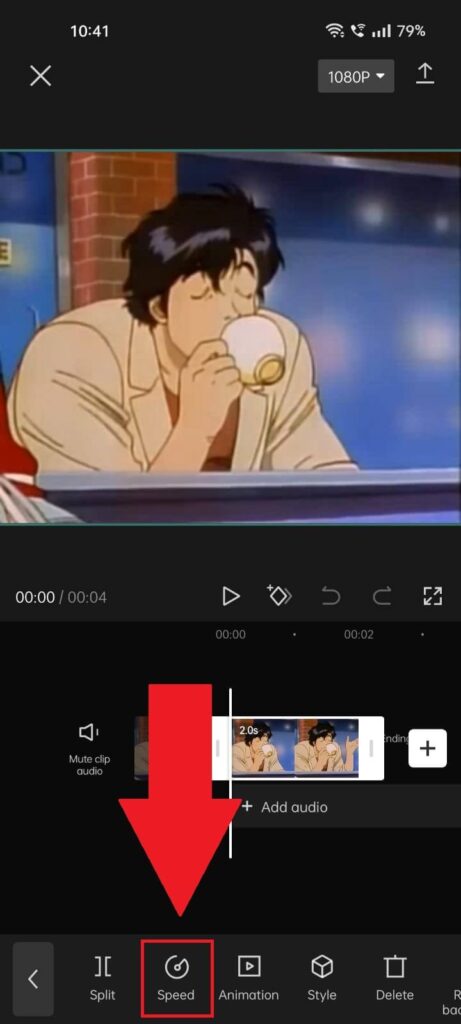
Selecting “Edit” will reveal several other options on the bottom-side menu. Tap “Speed” and see the next steps:
5. Tap on “Curve“

After selecting “Speed“, you’ll have to choose between “Normal” and “Curve” editing. The “Normal” speed editing lets you adjust the speed of the entire video. You don’t need that for now!
True velocity editing is when you adjust the speed of individual segments of a video. That’s what “Curve” editing is for, so tap on it.
And prepare to dabble in arcane editing…
6. Tap on “Custom“
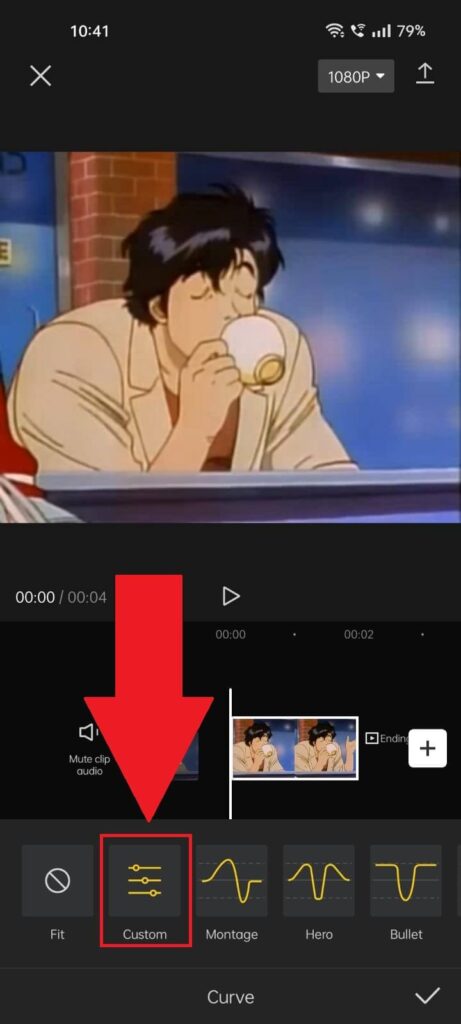
Next, you can either use one of the preset velocity edits like “Montage“, “Hero“, “Bullet“, and others. Tap on them and see what they do.
Or you can use the “Custom” option to create your own velocity edit. Do that now!
7. Select “Edit“
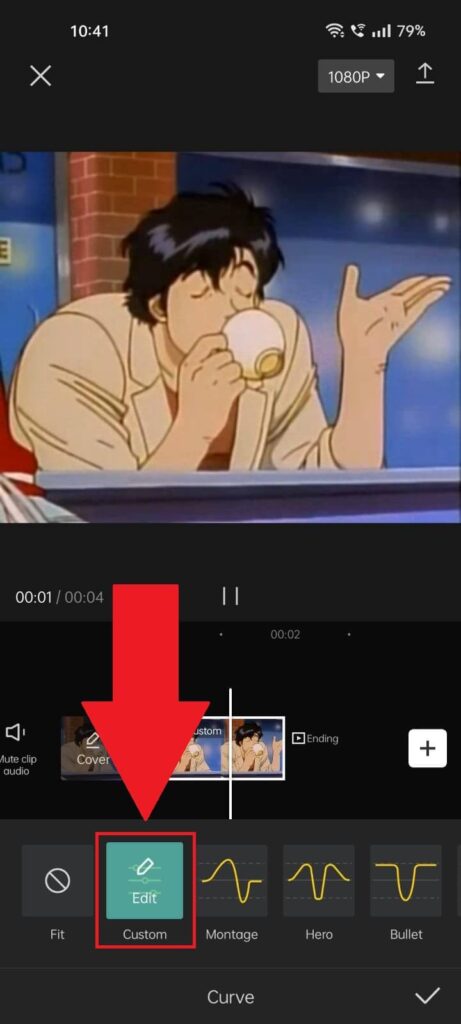
Once you tap on “Custom“, you’ll need to tap on it again because you’ll be asked to confirm your choice. The button will say “Edit” this time, so tap on it to proceed. Weird but necessary.
8. Move the dots up and down
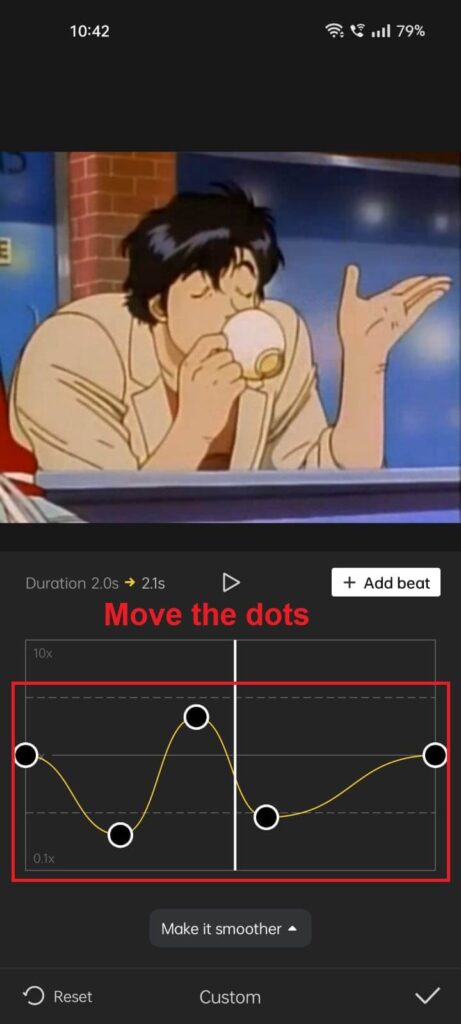
This is where the velocity editing (aka magic) happens. Do you see those dots? With them, you can control the speed of the video.
Moving the dot up increases the speed of a segment of the video. By moving it down, you decrease the speed.
The line between the dots is also important to understand how velocity editing works. An ascending line means that a specific video segment is playing faster.
A descending line means the segment of the video is playing slower. Play around with those dots, replay the video, and see how it changes.
9. Add other velocity dots or save your changes
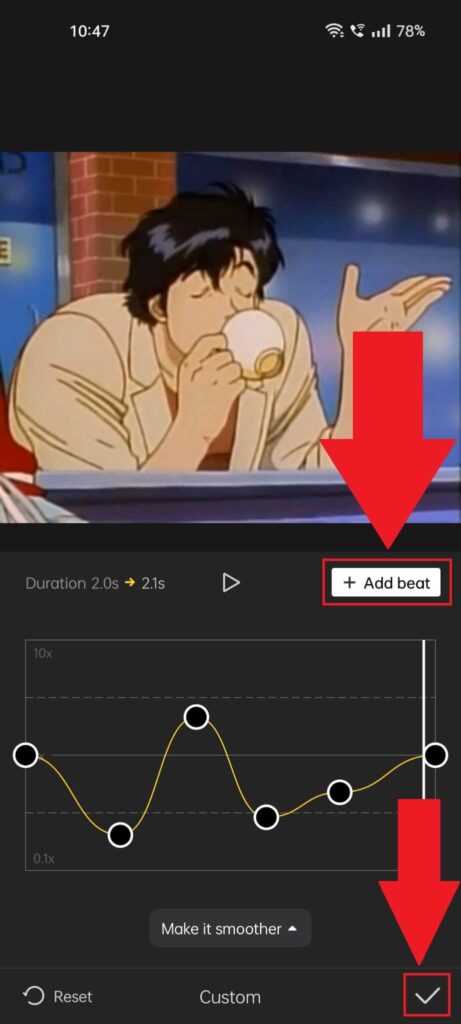
In CapCut, the velocity dots are called “Beats“, and you can add others to customize the video’s velocity even more closely.
Once you’re done editing the velocity of the video and are satisfied with it, save your settings by tapping on the checkmark icon in the bottom-right corner.
How Can I Add a Flash Effect on the Velocity Edit?
If you want to add a flash effect with the velocity effect, follow the steps below:
1. Select “Edit“
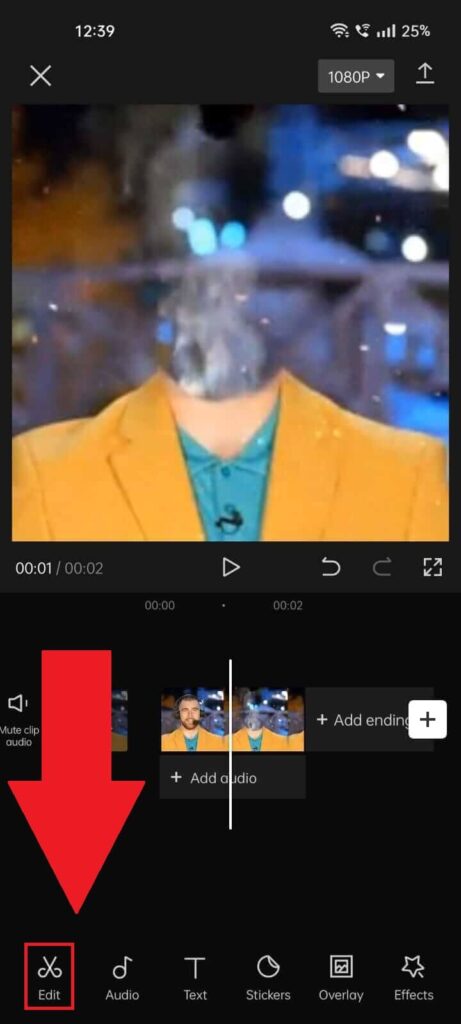
Open your velocity-edited video on CapCut and select “Edit” in the bottom-left corner.
2. Split the video before the velocity edit

In this menu, make sure you select the moment in the video before the velocity edit starts or right in the middle of it, depending on your preference.
Then, select “Split” from the bottom menu.
3. Select the split icon
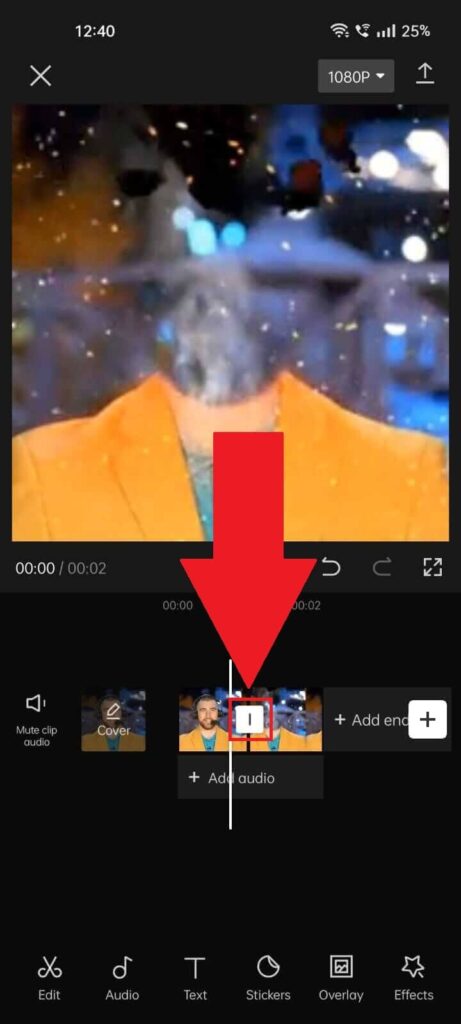
After you split the video, you’ll see that a new icon appears where you created the split. That’s called the Split Button. Select it and continue with the guide!
4. Select the “White Flash” option
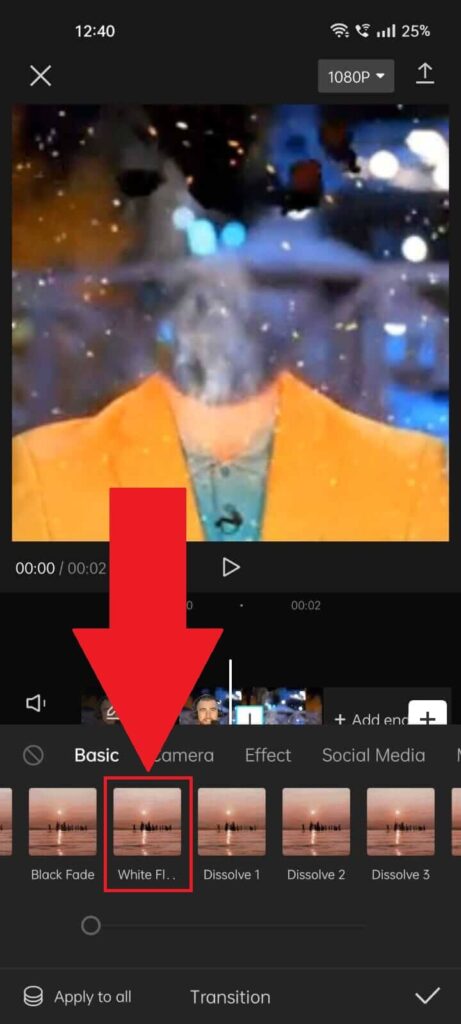
Once you tap on the split button, a new menu will appear at the bottom of the screen. In the “Basic” tab, look for the “White Flash” effect and select it. Then, save your video and see how the effect pans out.
Experiment with it and see how you like it best!
That’s it! We are done…
In short, you can make a velocity edit on your CapCut videos by following these steps:
- Create a new project and select a video
- Go to the “Edit” option in the bottom-left corner
- Select “Speed“
- Select “Curve“
- Select “Custom” and click on “Edit“
- Adjust the velocity points up and down
- Add or remove velocity points
- Save the changes
The velocity points (beats) control the increase or decrease in playback speed on specific video segments. Play around with them until you’re satisfied with the video playback. Save the changes, and you’re done!
Leave a comment below if you have questions about velocity editing on CapCut!