C’mon, just admit it – did you get your birthday wrong on Twitter? Eh, we all do that sometimes (and sometimes on purpose). Here’s how to change it, though…
Do these to change your Twitter birthday on a computer:
- Go to “Profile“
- Select “Edit Profile“
- Select “Edit” next to “Birth date“
- Tap on “Edit“
- Enter your actual birthdate and then select “Save“
Do these to change your Twitter birthday on mobile:
- Tap on your profile picture in the top-left corner
- Select “Profile“
- Select “Edit Profile“
- Tap on “Birth date“
- Select the birthdate field and tap on “Edit“
- Change your birthdate and select “Continue“
Don’t worry if it looks intimidating… I’ve got your back. Read below for an in-depth guide, with screenshots, about changing your birthday on Twitter!
Summary: In this article, I provide a guide on how to change your Twitter birthday on a computer or mobile device.

On a computer, the process involves going to “Profile,” selecting “Edit Profile,” selecting “Edit” next to “Birth date,” tapping on “Edit,” entering your actual birthdate, and selecting “Save.”

On a mobile device, the process involves tapping on your profile picture in the top-left corner, selecting “Profile,” selecting “Edit Profile,” tapping on “Birth date,” selecting the birthdate field and tapping on “Edit,” changing your birthdate, and selecting “Continue.”
Related: How to Clear the Twitter Cache?
Related: How to Report a Twitter Account and Get It Deleted?
Related: Does Twitter Notify When You Screenshot?

Change Your Birthday on Twitter – Computer
Most people are going to use Twitter on their computers (I mean, I guess?), so if you need to change your birthday on this platform, follow my instructions below:
1. Go to “Profile” on the left-hand side menu
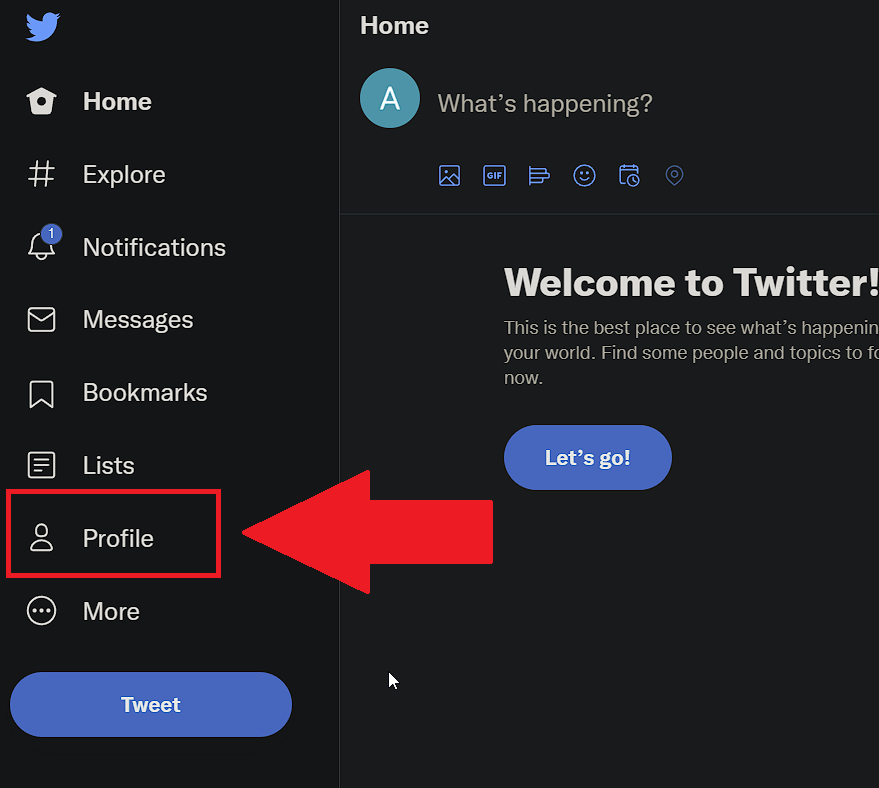
Begin by opening the Twitter website and logging in with your credentials.
Then, look for the “Profile” icon on the left-hand side menu bar. If you can’t find it, consult the screenshot I attached above.
Keep reading for more steps:
2. Select “Edit Profile“
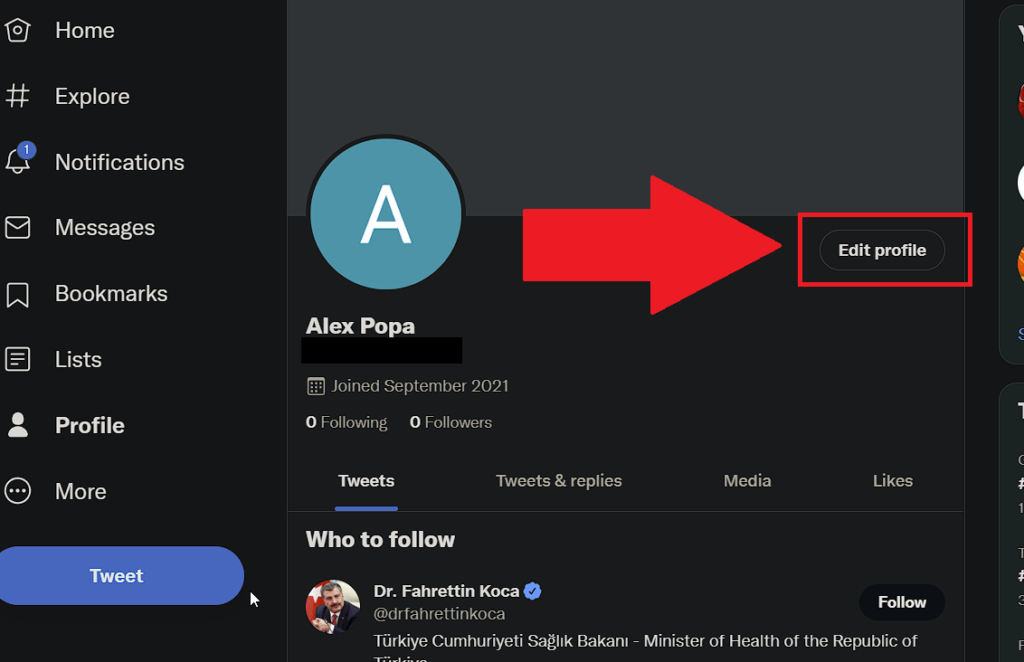
After selecting “Profile“, you’ll be taken to your Twitter profile. At this point, you should find the “Edit profile” button on the right-hand side.
Click it to start editing your profile info!
3. Select “Edit” next to your birthdate
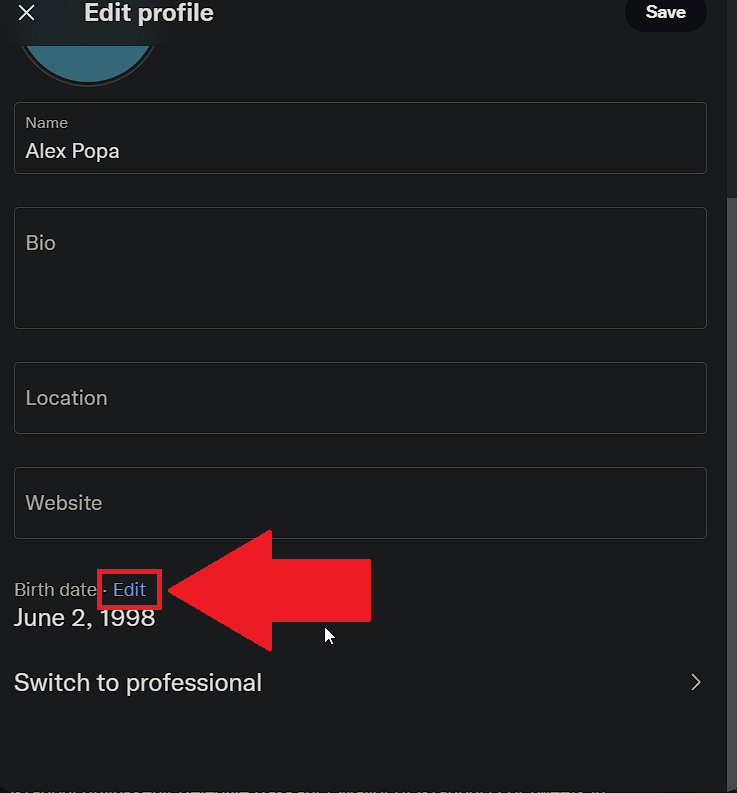
The “Edit Profile” window that appears (see screenshot above) will have several fields that you can edit (Name, Bio, Location, Website, Birth date).
Find the “Edit” button next to the “Birth date” heading and click it. You’ll find it above the “Switch to professional” button.
See below:
4. Tap on “Edit“
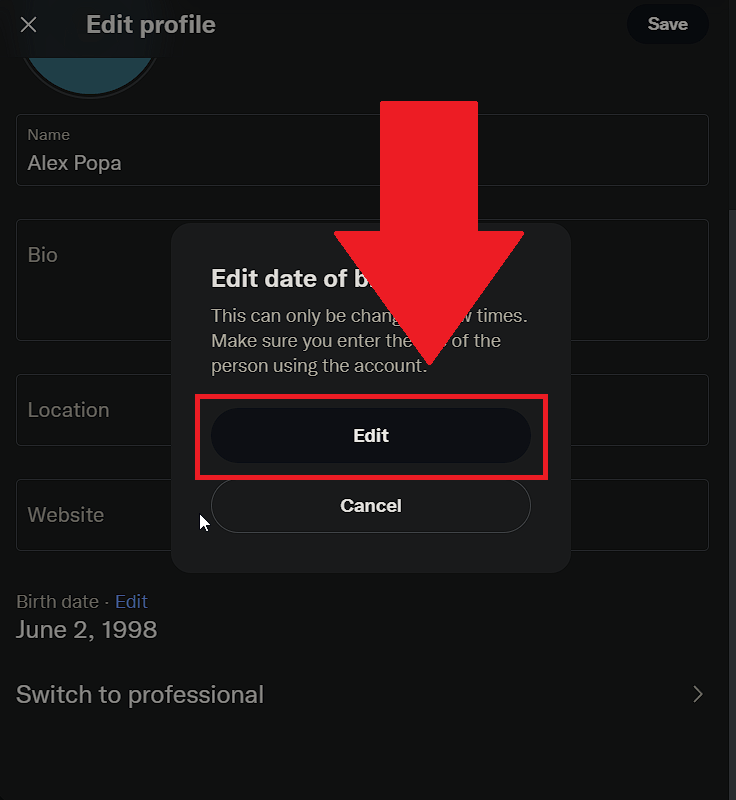
Selecting “Edit” on your birthdate will open a pop-up window where Twitter asks you if you’re sure you want to do this.
Apparently, you can only change your birthdate a few times before you’re not allowed to.
Whatever. Select “Edit” again to continue.
5. Change your birthdate and select “Save“
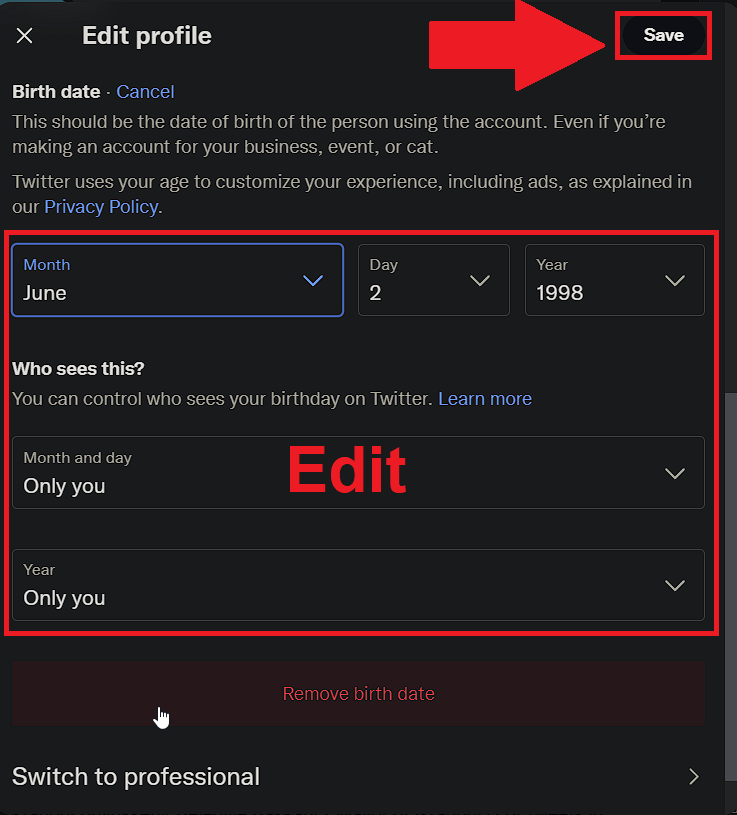
This is the good stuff right here! See all the fields in the screenshot above? Yeah, you’ll need to edit all of those.
Start with the “Month/Day/Year” fields. Those are your main birthdate fields you’ll want to edit.
Then, you might want to modify the visibility options if you don’t want people to see your birthdate.
Once you’re done with that, select “Save” in the top-right corner (check the screenshot above) to save your changes.
And that’s it. Now, moving on to the mobile guide…
Change Your Birthday on Twitter – Mobile
If you’re using Twitter on a mobile phone, follow my instructions below to change your birthdate in a few easy steps:
1. Tap on your profile picture

With Twitter opened on your phone, look for your profile picture in the top-left corner of the app. Tap on it and see what’s next:
2. Select “Profile“
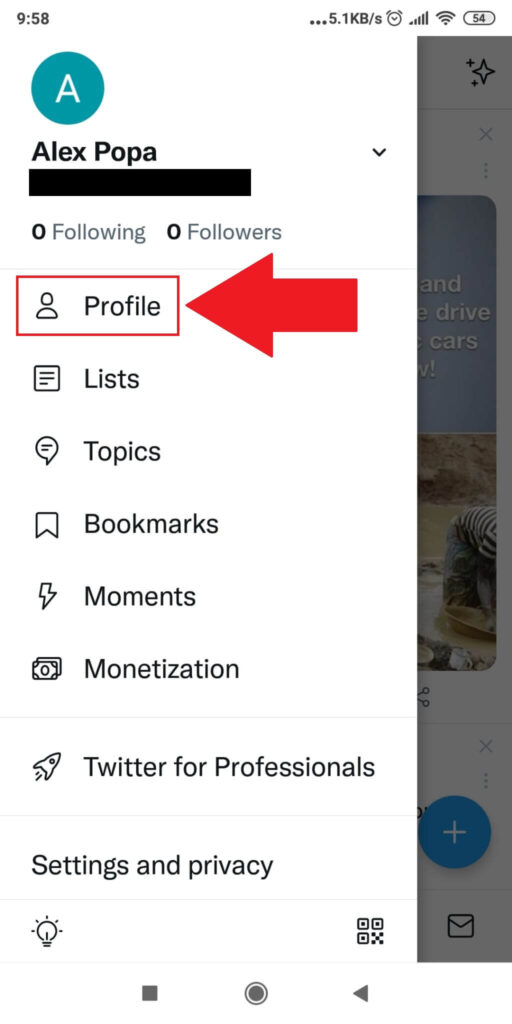
After tapping on your profile picture, a side menu will open with several options listed. Find the “Profile” option and select it to open your Twitter profile.
Then, keep reading:
3. Tap on “Edit Profile“
On your profile, you’ll see all sorts of information (tweets, media, likes, post recommendations, etc.) Ignore those.
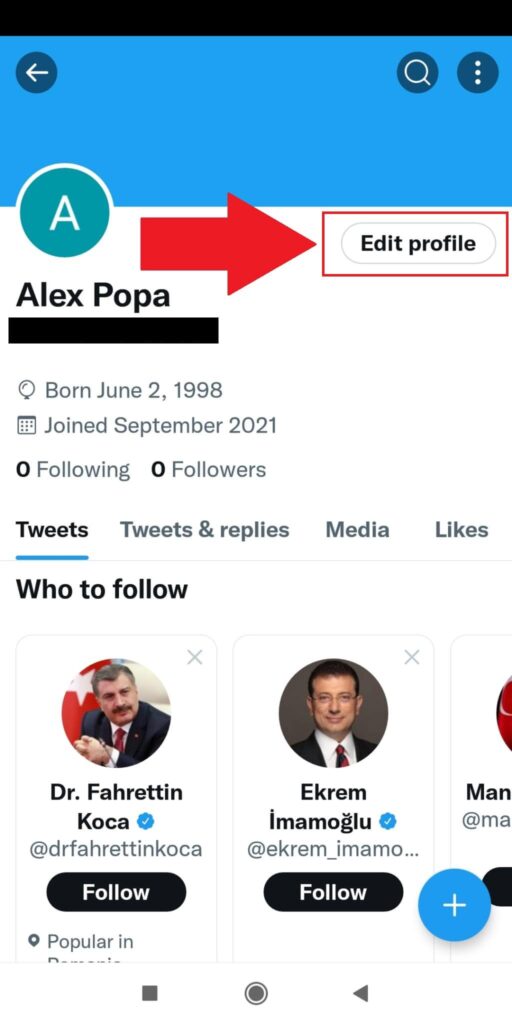
Instead, focus on finding the “Edit profile” button to the right of your profile picture (see the screenshot attached). Select it to continue with the guide!
4. Tap on your birthdate
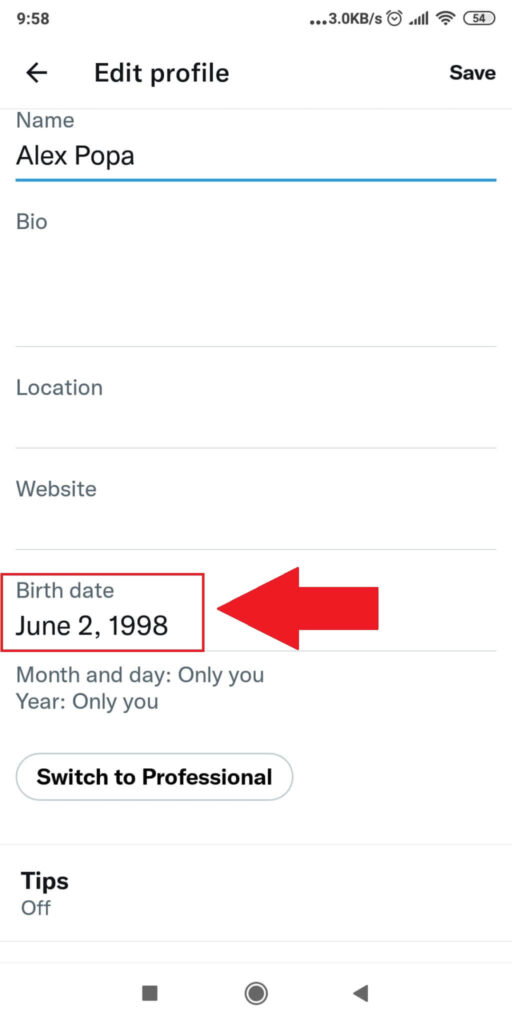
Once you’re on the “Edit profile” page, scroll down and find the “Birth date” field, just below the “Website” field. Tap it to start changing your birth date.
5. Change your birthdate and tap on “Continue“
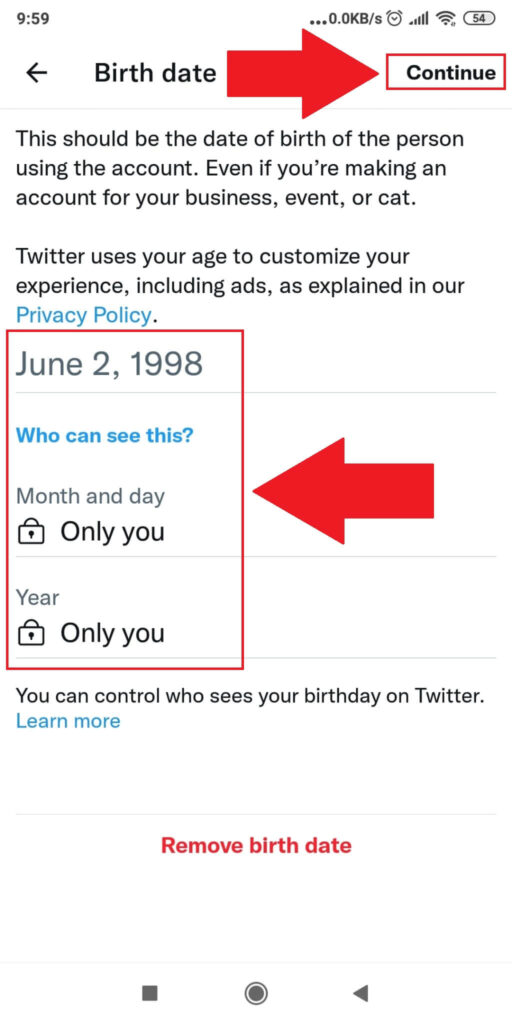
Here, you can change your birthdate. Adjust the month, day, and year, then choose a visibility option under “Who can see this?”.
Once finished, tap the “Continue” button in the top-right corner to save the changes to your Twitter account.
If you encounter any issues or make a mistake, please let me know in the comments section below, and I’ll help you fix it!
How many times can I change my birthday on Twitter?
When you go through the birthday-changing process on Twitter, you’ll be notified that you can only do this “a few times“.
It doesn’t specifically say how many times you’re allowed to change your birthday, though.
What we do know is that once you hit that magic number, you won’t be able to change your birthday anymore.
You’ll be stuck with the last birthday you’ve entered into the app.
However, I assume you can still change your birthday if you contact customer support and tell them to change it for you.
With this in mind, I recommend paying attention to the birthday you enter on Twitter as a precaution.
What happens if I enter the wrong birthday on Twitter?
Not many know about this, and Twitter doesn’t tell you about it either.
But if you enter a “wrong” birthday on Twitter, you’ll be locked out of your account. You’ll need to contact Twitter support to unlock your account.
But what is a “wrong” birthday on Twitter? Well, you can’t use Twitter if you’re under 13 years old.
So, if you enter a birthdate that says you’re below 13 years old, Twitter will lock your account and say you’re not allowed to the platform.
They’ll only unlock your account when you become 13. And unless you want to wait it out, I suggest changing your birth date.
Twitter will ask for your ID photo to confirm you’re over 13, though. Once you provide it, they’ll unlock your account and give you access.


