Wanna hide some of the Instagram reels because you find them repulsive, perverted, and frankly, pathetic? Yep, I can understand why.
Fortunately, the “Reels” category is separate from the “Explore” tab, both on the mobile app and on the Instagram website.
If you don’t want to see Reels, you just don’t access the “Reels” category, as simple as that. But what if you want to see quality reels and you keep getting flooded by low-quality content?
Well, in that case, you can hide those reels and tell the Instagram algorithm you don’t like them. Here’s how to do that:
- Open the Reels tab
- Find a Reel you don’t like
- Select the three-dot icon on the right-hand side menu
- Select “Not interested“
- Select “Don’t suggest posts from…“
I’ll show you step-by-step (with screenshots) how to hide unpleasant reels, so keep reading for extra details!
1. Select the “Reels” tab

Assuming you’ve already opened Instagram, look for the “Reels” icon (which looks like a movie clip) in the bottom-right corner of the feed and select it.
You can see it highlighted in the picture above, to the left of your profile picture. Select it and keep reading my instructions!
2. Find a reel you don’t like and tap the three-dot icon

Once you get to the Reels page, get ready for a dose of innuendos, perverted content, and softcore porn because that’s the current state of Instagram today.
Anyway, find a reel you don’t like (it shouldn’t be too hard) and look for the three-dot icon on the right-hand side menu (under the DM icon).
Select it and see the next steps 😀
3. Select “Not interested“
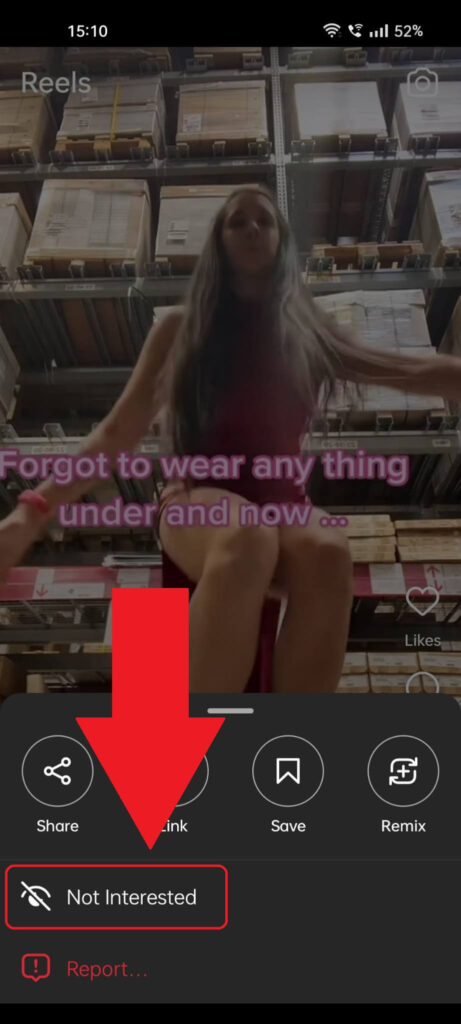
Once you tap the three-dot icon during the previous step, you’ll see several options split into two horizontal and one vertical menus.
You only need the “Not Interested” option in the vertical menu (see it highlighted above). Select that and see my last step below!
4. Select “Don’t suggest posts from…“
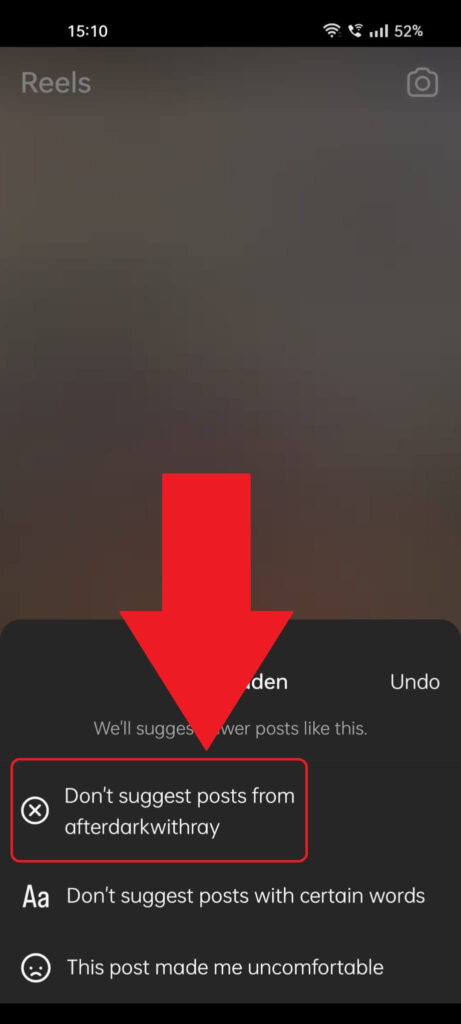
Last but not least, once you’ve hidden that particular Reel, you also have the option to hide all posts from this creator, which you’ll most likely want.
So, select “Don’t suggest posts from…” (where the three dots represent the name of the creator), and you’re done. You won’t ever see Reels from that creator.
But you WILL see dumb similar Reels from other creators, so I think you have quite the journey ahead to clean up your Reels section (it seems impossible if you ask me).
Need more assistance with your Instagram account, or perhaps you need help doing the same on your computer? Let me know in the comments below, and I’ll gladly help you!