Did you post something ridiculous on Instagram and don’t want other people to see it? Or have you posted something earlier than you should and want to hide it temporarily?
Here’s how you can hide posts on Instagram:
- Navigate to the post you want to hide
- Tap on the three-dot icon in the top-right corner of the post
- Select “Archive‘
And here’s how to unhide them:
- Go to your profile
- Tap on the Hamburger icon
- Select “Archive“
- Select the post you want to unhide
- Tap on the “More” option in the bottom right corner
- Select “Share as post…“
- Go through the posting process and post your content
It’s nothing too complicated, but if you need a step-by-step guide on hiding and unhiding Instagram posts, read below!
Summary:

How to Hide and Unhide Posts on Instagram Using the Archive Feature

In this article, I explain how to hide and unhide posts on Instagram using the Archive feature. This tool allows you to manage your posts without permanently deleting them, offering a way to clean up your feed while keeping your content accessible.

Hiding a Post

Hiding a post on Instagram is simple. Follow these steps:

1. Open the Instagram App: Launch the Instagram app on your mobile device.
2. Go to Your Profile: Tap on your profile icon at the bottom right of the screen.
3. Select the Post to Hide: Find the post you want to hide and tap on it.
4. Tap the Three-Dot Icon: In the top right corner of the post, tap the three-dot icon.
5. Choose "Archive": From the menu that appears, select "Archive." Your post will be hidden from your profile but not deleted.

Unhiding a Post

Unhiding a post is just as easy. Here’s how:

1. Go to the Archive Section: Navigate to your profile, tap the three horizontal lines in the top right corner, and select "Archive."
2. Choose the Post: In the Archive section, browse through your archived posts and select the one you want to unhide.
3. Tap "Share as Post…": Tap on the post, then select "Share as post…" to start the reposting process.
4. Complete the Posting Process: Follow the prompts to add any captions or tags, then tap "Share." The post will reappear on your profile.

Managing Your Instagram Feed

Using the Archive feature allows you to easily manage your Instagram feed. You can hide posts that are no longer relevant or you simply want to keep private for a while, and unhide them whenever you’re ready to share them again.

Have Questions?

If you have any questions about hiding or unhiding posts on Instagram, feel free to comment below. Stay tuned for more helpful articles on social media!

Happy Instagramming!

Hide Your Instagram Posts – Step-by-Step
Follow the steps below to see how you can hide your Instagram posts:
1. Tap on the three-dot icon next to your post
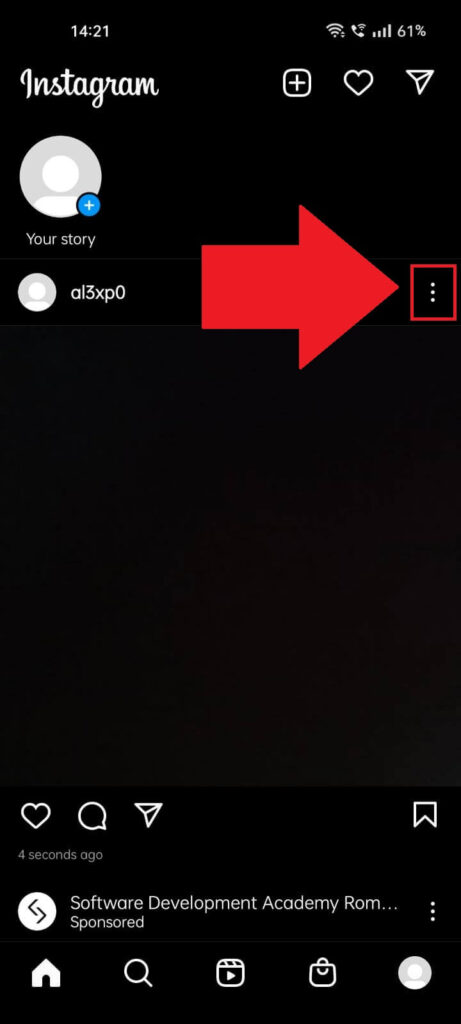
The first step in hiding an Instagram post is finding it. Once you find it, look for the three-dot icon in the post’s top right corner.
Tap on it and continue with the guide!
2. Select “Archive“
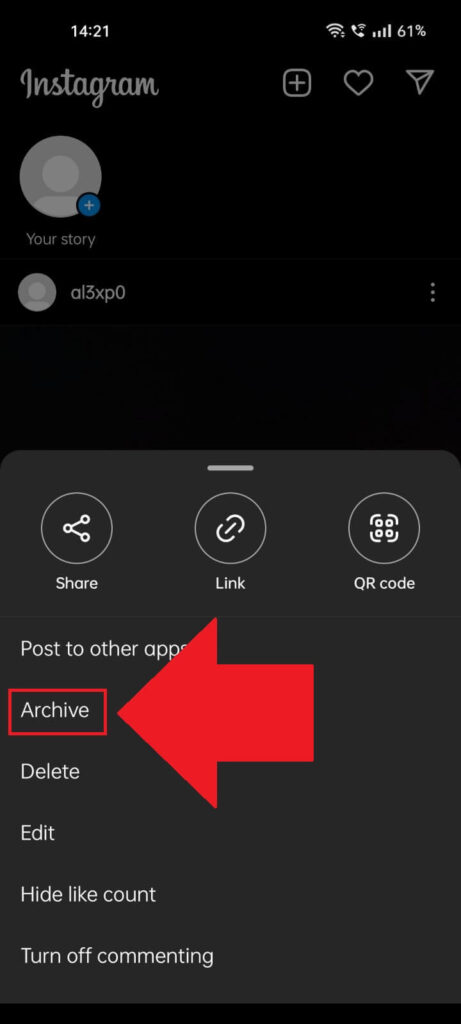
After you tap on the three-dot icon, a menu will appear at the bottom of the app. Tap on “Archive” to hide the Instagram post indefinitely.
There is no “Hide” option. Instead, that option is replaced by “Archive“, which puts your post in a digital archive that only you can access.
Archived posts disappear from your timeline, and no one can see them. But what if you want to unhide a post? Read below for that!
Unhide Your Instagram Posts – Step-by-Step
To unhide an Instagram post, follow the steps below:
1. Tap on your profile picture
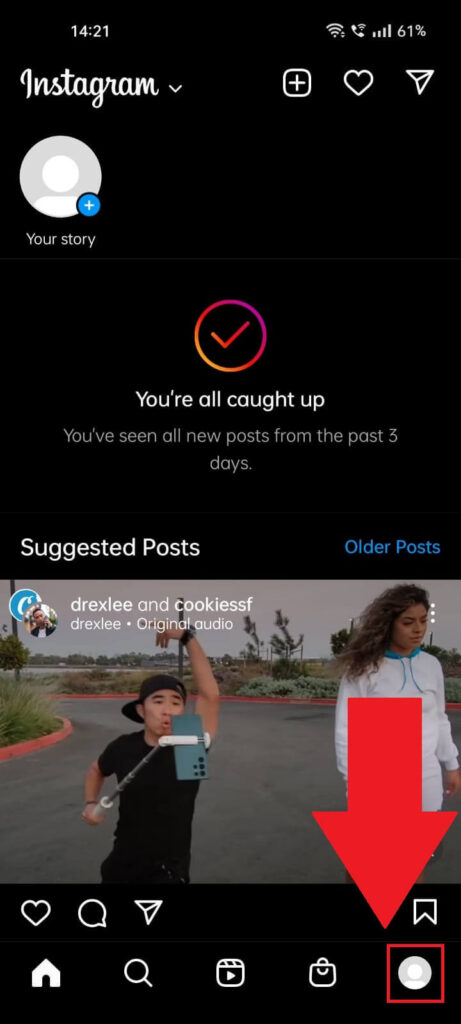
The first step in unhiding your post is going to your profile page. To do that, tap on your profile picture in the bottom right corner.
If you haven’t set a profile picture, the icon will show a silhouette, but it’s the same option. Tap on it and continue with the guide!
2. Tap on the Hamburger icon
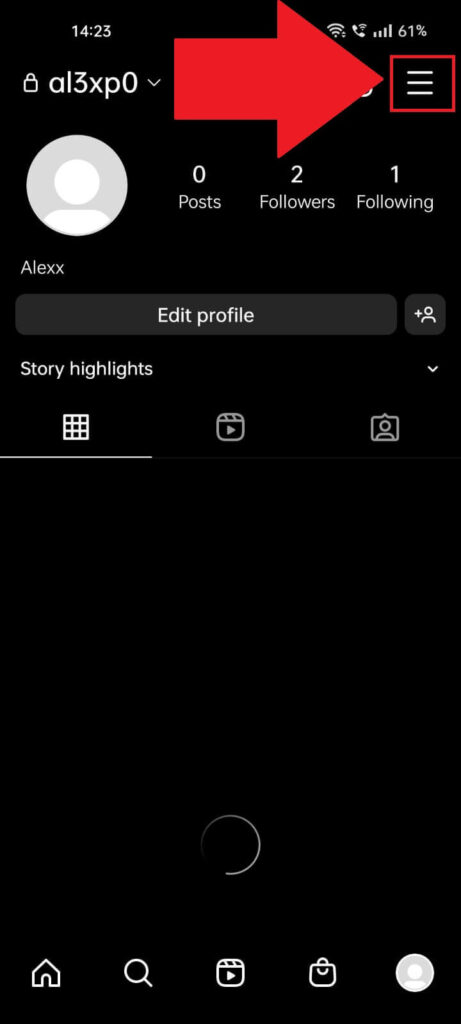
Once you get to your profile page, look for the Hamburger icon in the top-right corner. It’s named like this because the three horizontal lines look like a Hamburger, and that’s how the community has dubbed it.
3. Select “Archive“
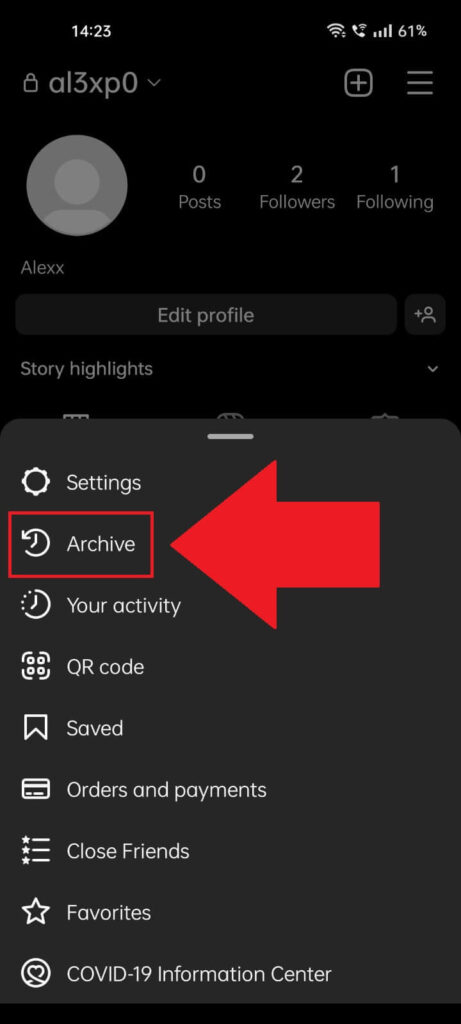
Good. After you tap on the Hamburger icon, a menu will open at the bottom of the app. You know this menu. It has multiple options like “Settings“, “Saved“, “QR code“, and more.
Select the “Archive” option to proceed.
4. Select the post you want to unhide

After you select the “Archive” option, Instagram will take you to the “Stories archive” section. This is where all your hidden posts are at.
Select the post you want to hide by tapping on it.
5. Select the “More” option
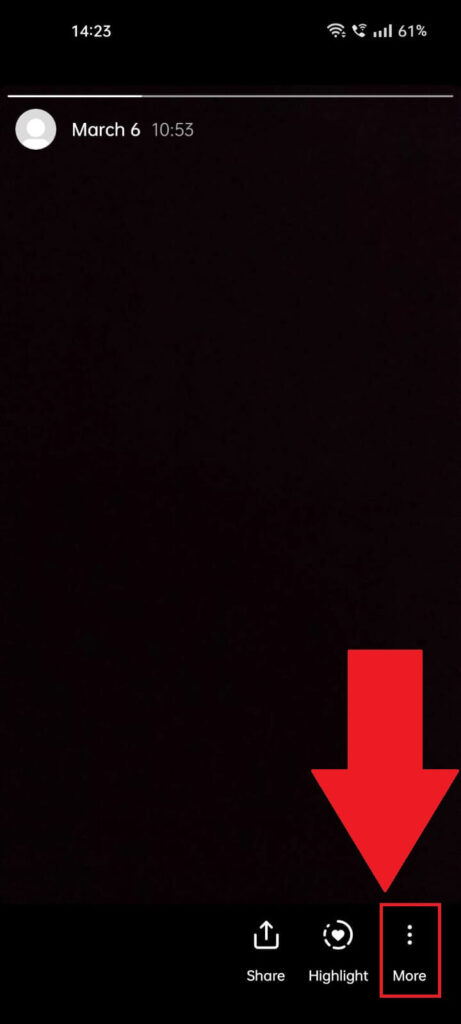
Once you open the post, you want to unhide; look in the bottom right corner for the “More” option and select it. This will open a settings window for this particular post.
6. Select “Share as post…“
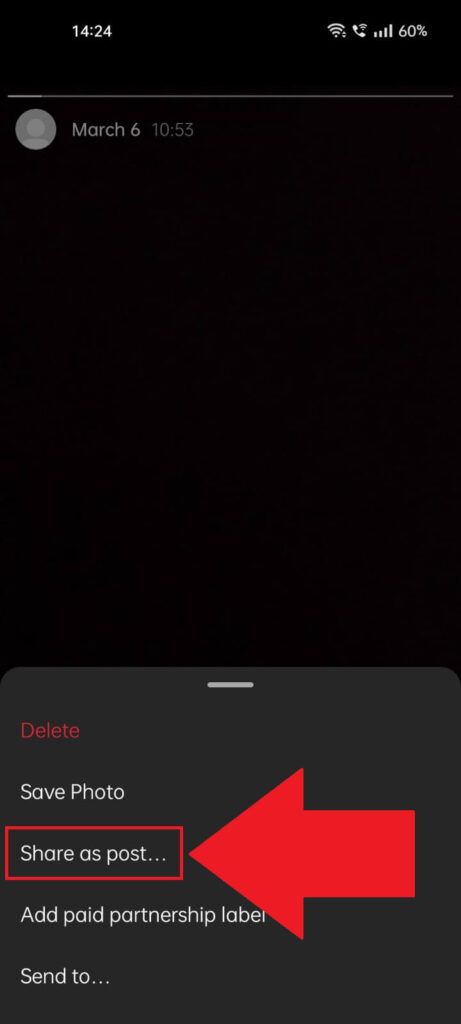
After you tap on the “More” option, a menu will open up with several settings. Select the “Share as post…” option to unhide the post.
Mind you; there is no “Unhide” option because that’s not how archived posts function. You’ll need to repost a post if you want to unhide it.
7. Crop the post and proceed
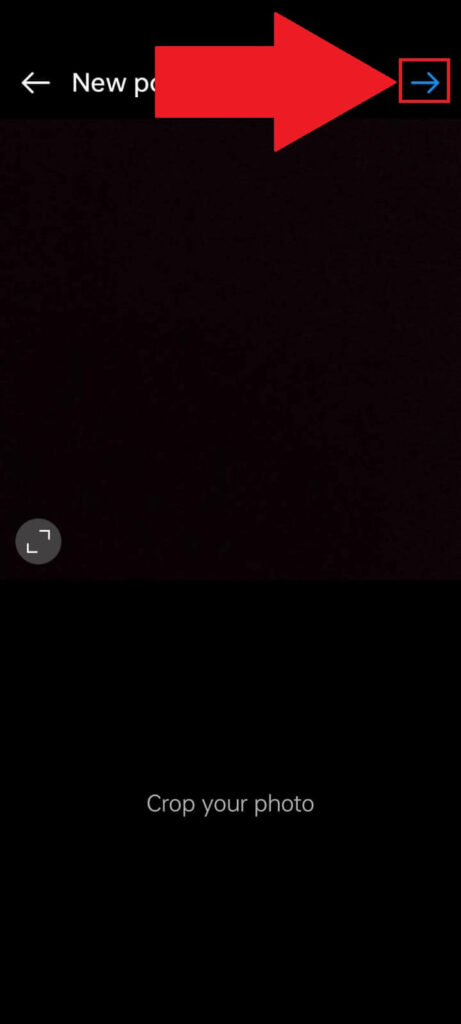
Now, Instagram will take you through the posting process. First, you’re tasked with cropping the photo if you want to.
After cropping (or not), tap on the blue arrow in the top right corner to proceed.
8. Add an effect and proceed
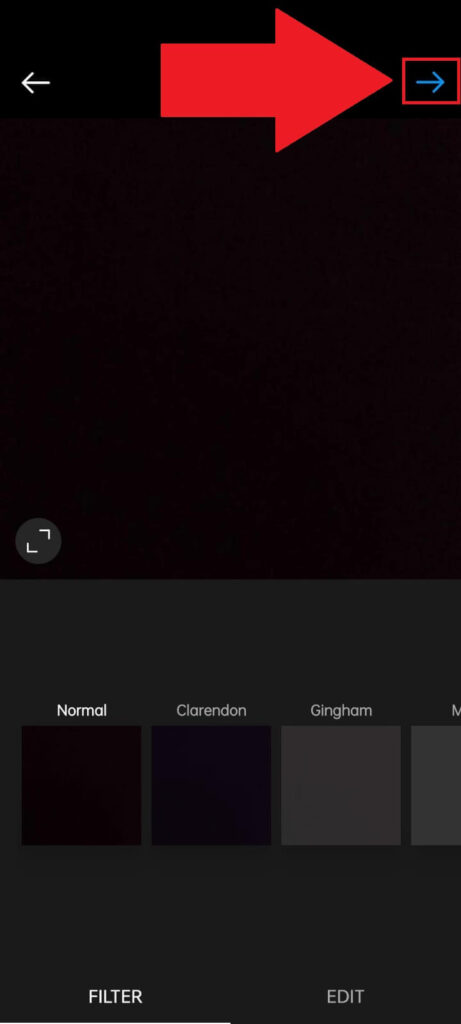
Next, you can choose to add an effect to the photo/video. If you don’t want to, tap the blue arrow in the top right corner to proceed.
9. Finish the posting process
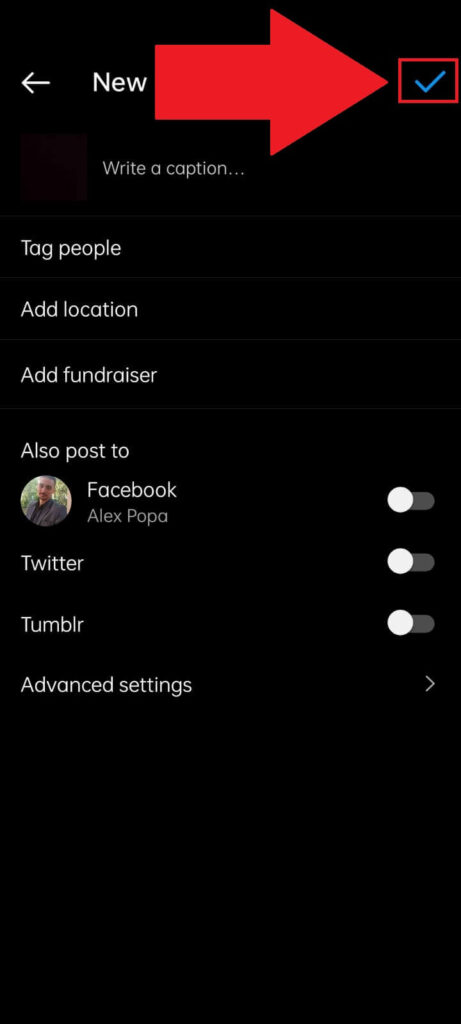
Finally, you can add a caption, location, tag people, and do anything you can do while posting something on Instagram.
When you’re finished, tap the blue arrow at the top to finish the posting process. And you’re done; you’ve just unhidden your post on Instagram!
Conclusion
In short, to hide a post on Instagram, tap the three-dot icon next to a post and select “Archive.” That post will be in your profile’s special “Archive” section.
To unhide a post, go to that section on your Instagram profile, select the post, select “Share as post…” and go through the posting process.
That’s right, unhiding a post means reposting it effectively. It’s like saving a draft for a post you don’t want to post, but you may post later.
Only that you can archive posts after you’ve posted them, which is helpful if you’ve made a mistake!
If you have questions about hiding/unhiding posts on Instagram, comment below, and I’ll reply soon.
Also, stay tuned for more articles about Instagram and other social media platforms. Whenever you’re having problems with a social media platform, chances are we can help you solve them!