Rich Presence is a fairly new feature on Discord that allows you to add interesting profile info about the game you’re playing.
It may show the level you’re at, the boss you’re fighting, how long you’ve been playing, and other geeky stats. Basically, a gamer’s wet dream.
But how do you get a custom rich presence on the platform? Well, I did some digging, performed some tests and crunched some numbers, and got you this guide:
- Install BetterDiscord
- Install AutoStartRichPresence
- Install BDPluginLibrary
- Add specific plugins to BetterDiscord
- Create an app on the Discord Developer Portal
- Add images to the “Art Assets”
- Open the “Visualizer” and make the necessary edits
- Copy the app ID and open the AutoStartRichPresence settings
- Open the “Visualizer” and paste the data into the AutoStartRichPresence
- Enable the “Game Activity” feature
Ten bloody steps that aren’t particularly easy to follow. But hey, if you’re really determined to create a customized rich presence, who am I to stop you?
Quite the opposite – I’ll help you get through this faster and easier with a detailed guide and screenshots to help you out. Keep reading!
Summary: In this article, I'll guide you through customizing your Rich Presence on Discord, which showcases your in-game activity on your profile.

This ten-step process includes installing BetterDiscord and plugins, creating an app on the Discord Developer Portal, adding images to the app, and adjusting settings.

Although the steps might seem daunting, my detailed guide with screenshots will help you easily navigate the process. By the end, you'll have a unique Rich Presence that enhances both your gaming experience and social interactions on Discord.
Related: How to Contact Discord?
Related: How to Cancel Discord Nitro?
Related: How to Add Rules to Your Discord Server?
Step-By-Step Guide on How to Get a Custom Rich Presence on Discord
This is gonna be a long one, so we’d better get started:
1. Download BetterDiscord
We’ll start by downloading BetterDiscord, the addon for Discord that does pretty much anything and everything.
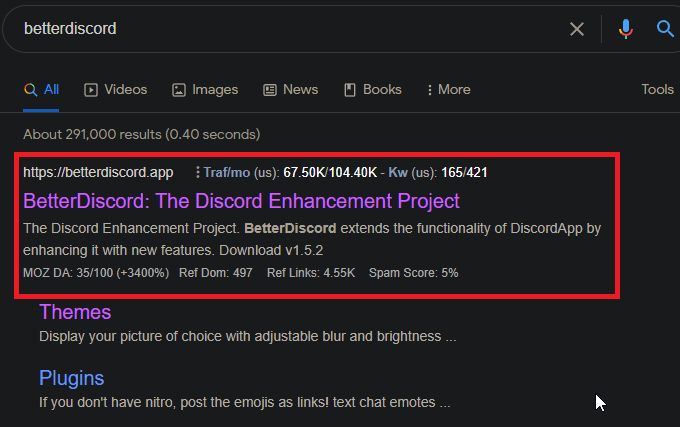
Go to the “betterdiscord.app” website and find the “Download” button (below).

Click on it to start the download. It should take 3-4 seconds for the BetterDiscord installer to finish downloading.
Once it finishes, you’ll need to install it.
2. Install BetterDiscord
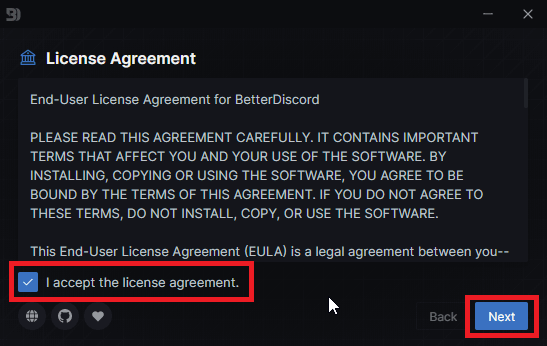
When you open the BetterDiscord installer, you’ll see the interface above. The User Agreement, which no one read ever. Just accept it and move on!
The next window will ask you what you want to do with the installer – Install the app, repair it, or uninstall it.
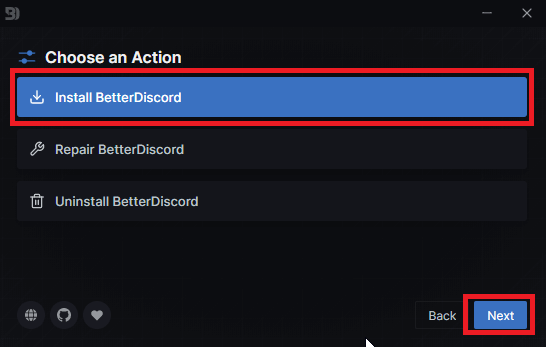
Check the “Install BetterDiscord” option and click “Next” to proceed with the next step.
You’re already halfway through the installation process. Nice! And only a quarter through the guide. Not nice!
Next up, the installer will ask you to choose a Discord version to install BetterDiscord for.
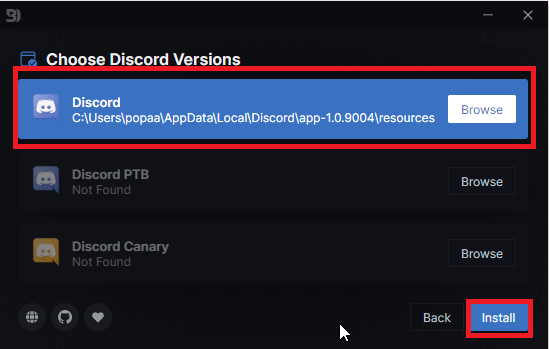
I don’t know what those other two options are, and since only “Discord” appears to be available, choose that and proceed.
The installation process shouldn’t take more than a couple of minutes, and once it finishes, it’s time to create your custom Rich Presence!
3. Download AutoStartRichPresence
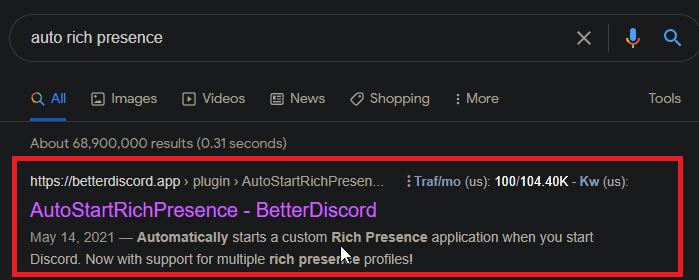
First step (technically third) is downloading AutoStartRichPresence from the BetterDiscord website (see the screenshot above for more information).
Select the first search result and get to the plugin page.
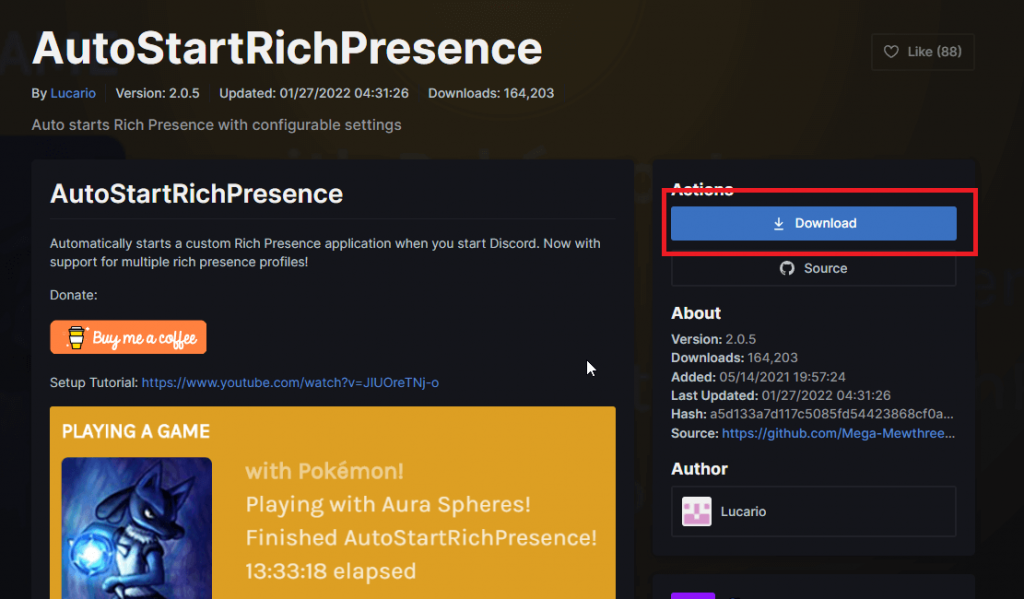
Once you’re there, look for the “Download” button.
It should be on the right, under the “Actions” menu. Check the picture above if you can’t find it!
If you look at the plugin’s description, it says, “Automatically starts a custom Rich Presence application when you start Discord.” Just what you need.
Click on “Download” to download the plugin.
4. Download ZeresPluginLibrary
Next, you’ll also need to download an additional plugin that ties everything together.
You can get it from here.
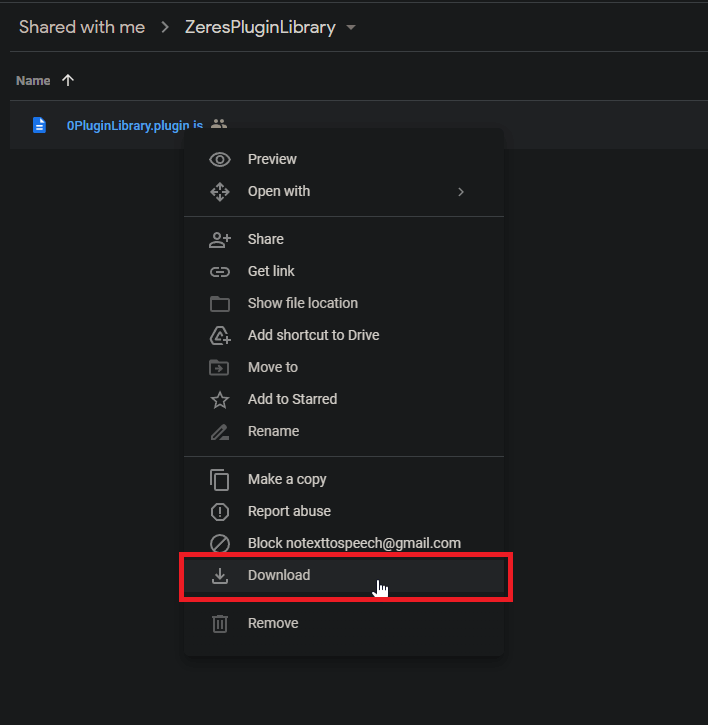
Right-click on the Google Drive folder file and select “Download.”
Ignore any warnings your computer might issue because it’s a false-positive alarm (I tested it myself).
Millions of Discord users use this plugin, and it’s been security-checked countless times, as well.
After downloading this plugin, it’s time to install both plugins on BetterDiscord.
5. Install AutoStartRichPresence and ZeresPluginLibrary
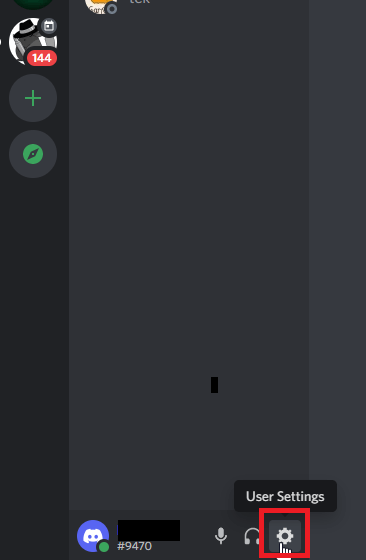
To install both plugins, you’ll need to open Discord and go to the “User Settings.”
Look for the gear icon on your Discord app and click on it.
Once you open the User Settings, you’ll see multiple options in a new window.
You’ll need to look for the “Plugins” option (on the left) and select it.
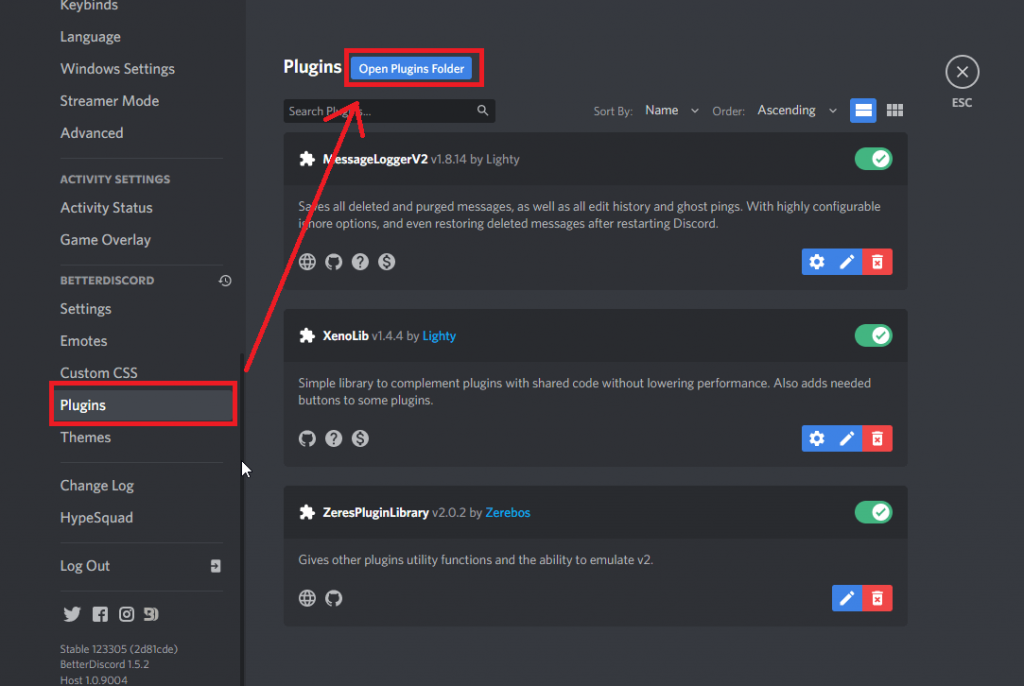
Once you select “Plugins” on the left-hand side menu bar, look toward the center of the page for the “Plugins” heading.
Next to it, you’ll see the “Open Plugins Folder” option in blue. Click on it to start uploading the plugins you downloaded earlier.
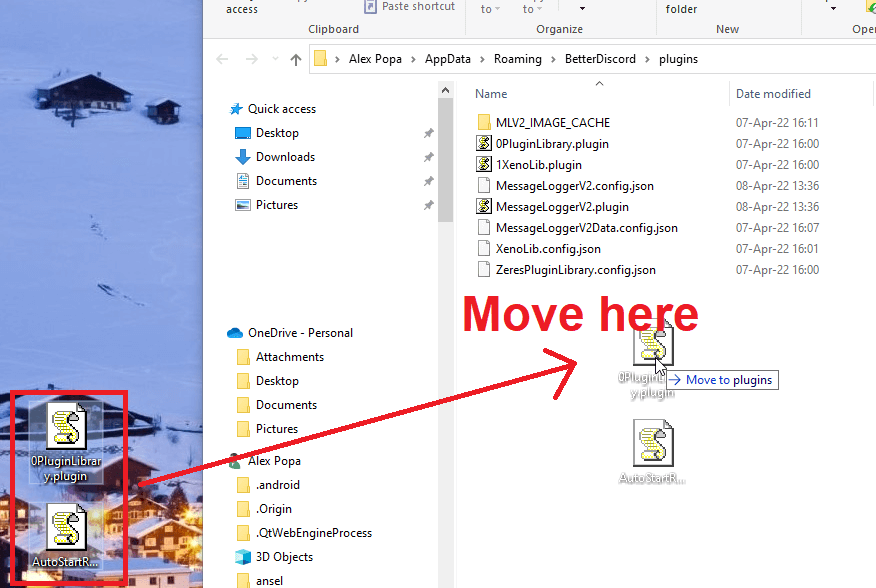
Once you tap on “Open Plugins Folder“, a Windows Explorer window will open, the “plugins” folder for the BetterDiscord app.
This is where you need to place the AutoStartRichPresence and ZeresPluginLibrary files (plugins) you downloaded earlier.
Copy-paste them (or move them) to this folder from your Desktop or the folder you downloaded them to.
Now, return to Discord in the “Plugins” menu. You should notice that the two plugins you copied are already shown here.
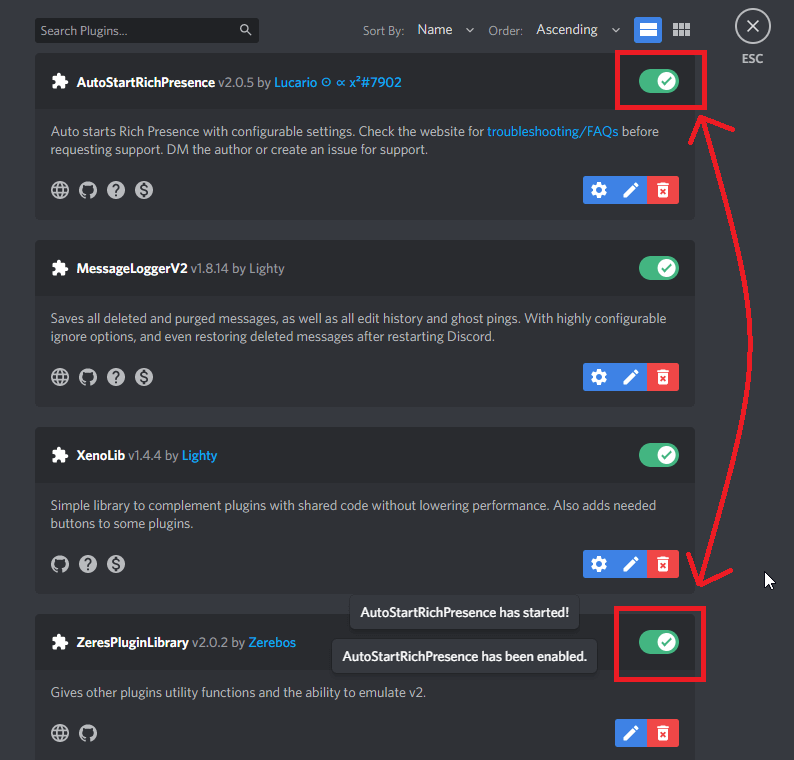
Ensure you enable both plugins by clicking on the check boxes next to their names.
When the plugins are enabled, they turn green.
When they’re off, they become grey. After you enable both plugins, move to the next step.
6. Create an app on the Discord Developer Portal
Next, you need to create an app on the Discord Developer Portal. Go here.
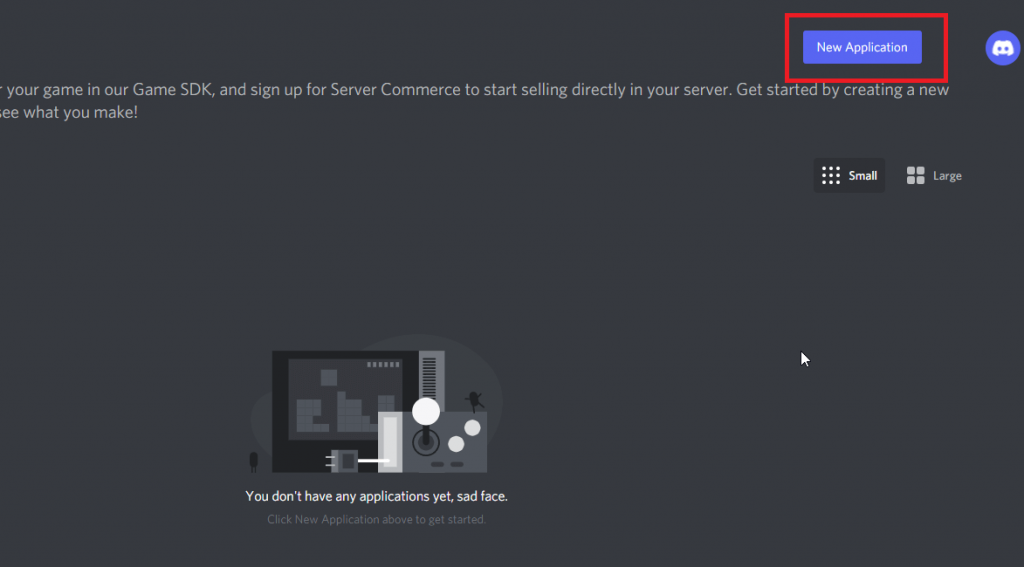
Inside the Developer Portal, look for the “New Application” button in the top-right corner (it’s colored in blue).
Click on it to start the process of creating a new app on Discord.
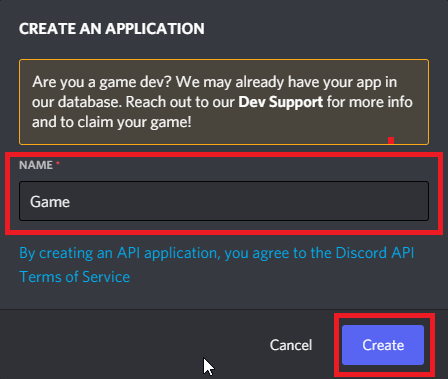
Give it a name (preferably the name of your game), and then click on “Create.”
This will create an app with the name you’ve given it, and it’ll be the backbone of your Rich Presence statuses from now on.
7. Add Images
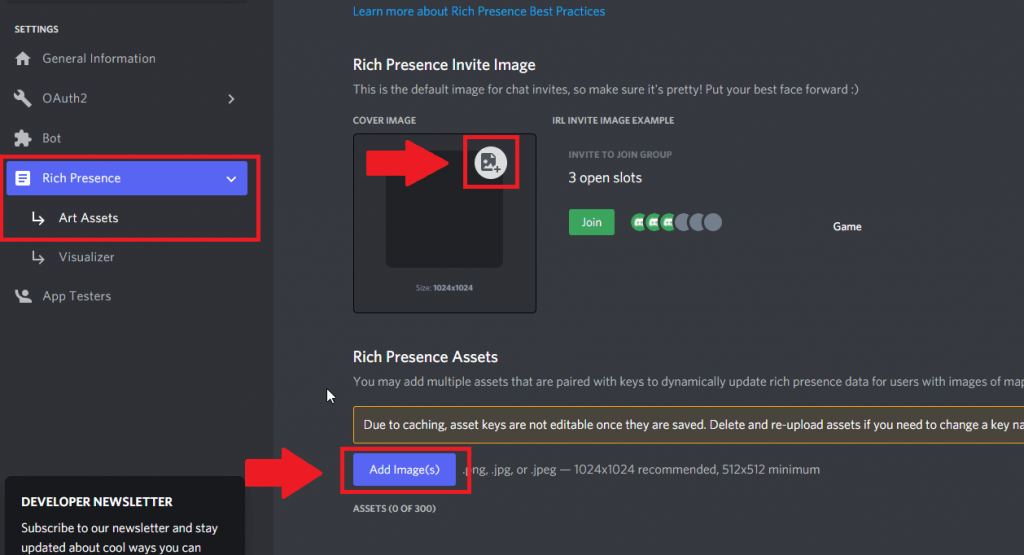
Now that you’ve created an app, you’ll see new menus on the right-hand side.
Go to “Rich Presence” and click on “Art Assets.” (check the screenshot above).
This is where you’ll add the images that you want to appear on your profile as the Rich Presence.
Upload a cover image by clicking on the appropriate button near the “Cover Image” title.
And then, click on “Add Image(s)” to add several images from your computer.
Then, save your changes by clicking on the “Save Changes” button in the bottom-right corner.
8. Edit the “Visualizer” Settings
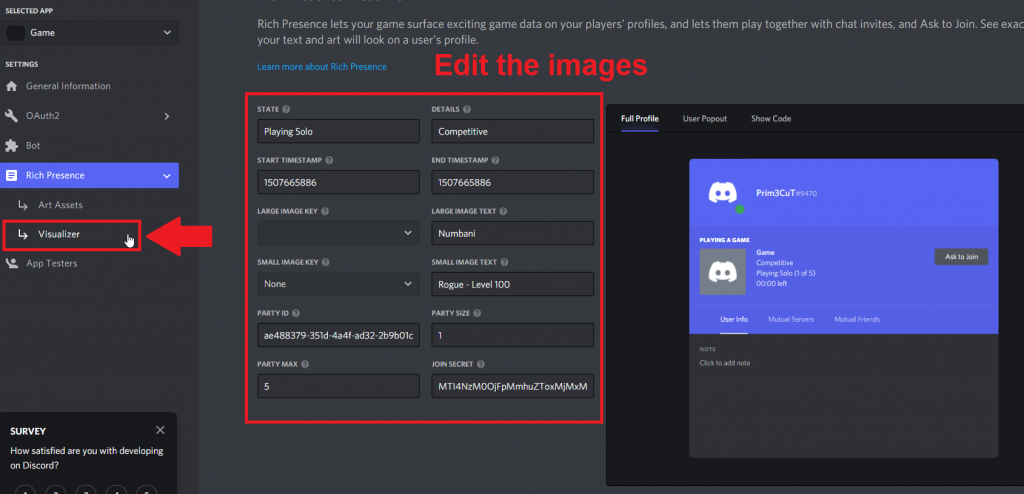
Next, go to “Visualizer” to edit the image sizes, details, and other details (if you want to).
You can customize your Rich Presence in the “Visualizer” screen.
You’ll see how your change affects the end result on the right.
When you’re done, save the changes and move to the next step.
9. Create a New Profile in the AutoStartRichPresence Settings
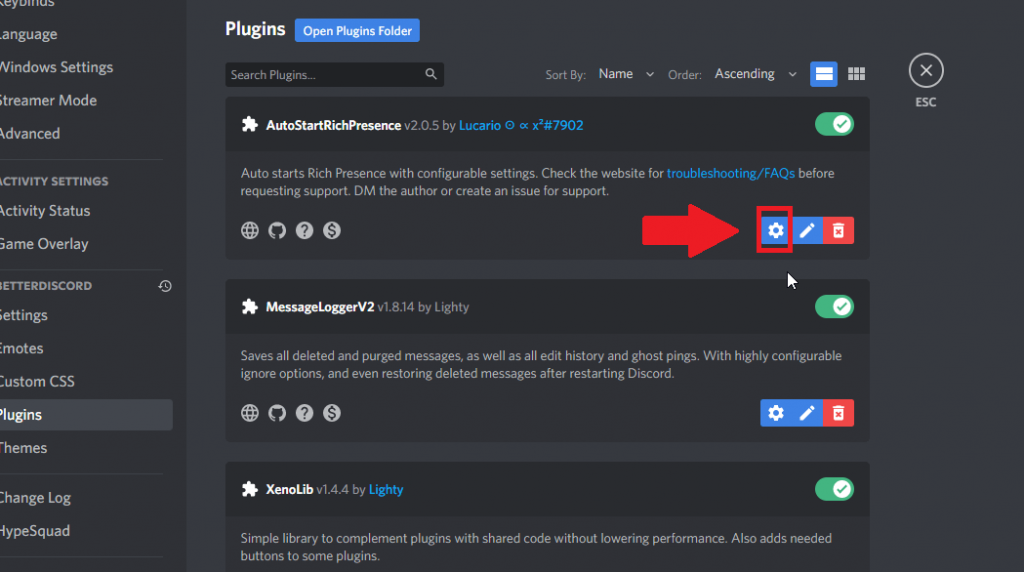
Now you need to create a new profile in your AutoStartRichPresence settings.
Go back to Discord in the “Plugins” menu and click on the gear wheel of the AutoStartRichPresence plugin.
This will open a new window where you can create the new Custom Rich Presence profile.
You’ll need to copy some data from the Discord Developer Portal to the Discord AutoStartRichPresence profile.
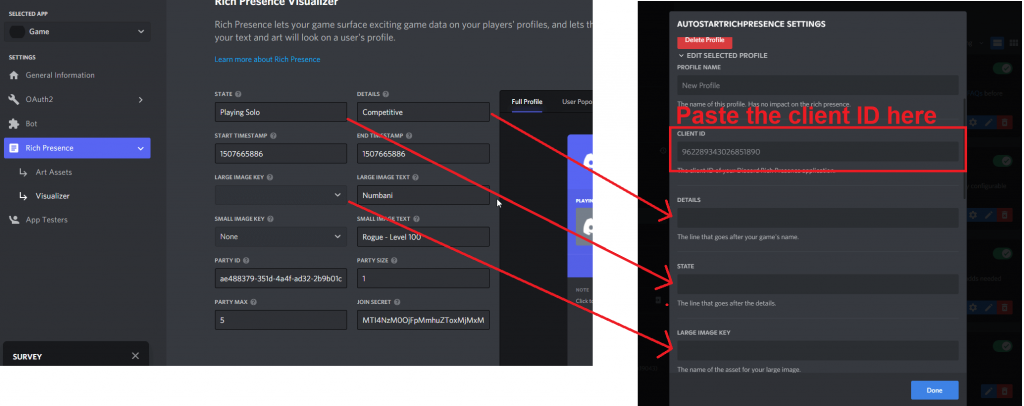
Go to “Rich Presence” – “Visualizer” and copy the data in those fields to the AutoStartRichPresence profile.
The name of the fields should be identical.
So, you should copy the data from the “Details” field to the “Details” field in Discord, like in the image above.
Continue doing this will all the required data.
Moreover, you’ll need to add the client ID in the AutoStartRichPresence profile settings.
You can get the client ID from the Discord Developer Portal by going to “General Information.”
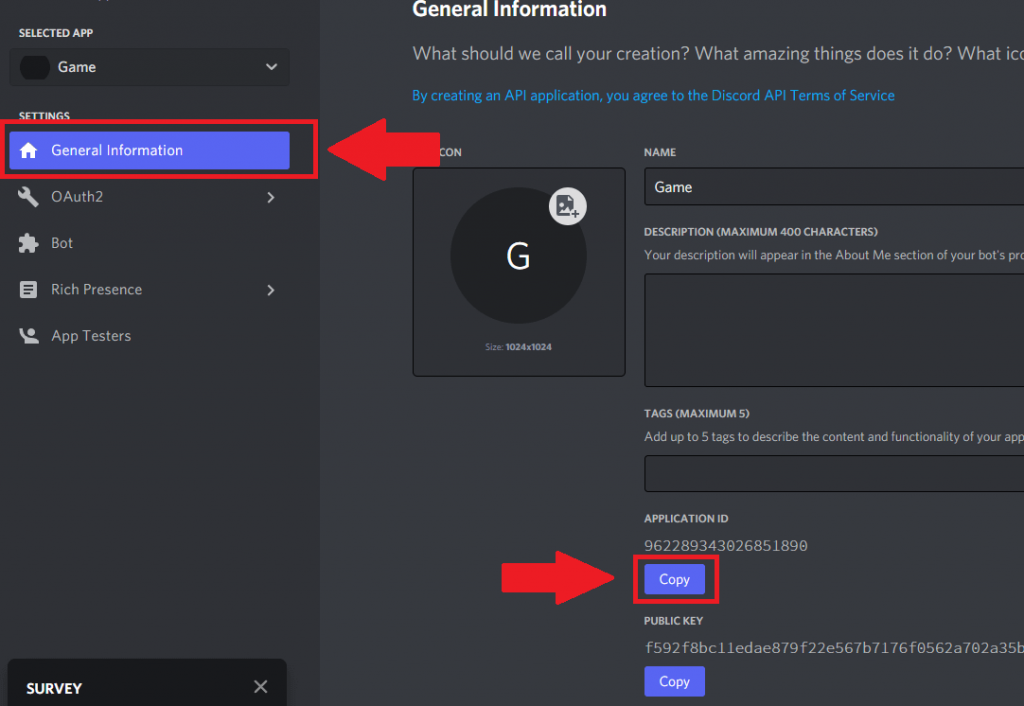
The “General Information” tab is in the Discord Developer Portal. Click on it and see the “Application ID” page.
There’s a “Copy” button under the ID. Click on it, and the ID will be copied to your clipboard.
Then paste it into the appropriate ID field in the AutoStartRichPresence profile settings.
10. Enable the “Activity Activity” feature
You’re done customizing the Custom Rich Presence. There are no more edits to be done. Finally.
Or not…
Now, all you have to do is enable the Activity Status feature.
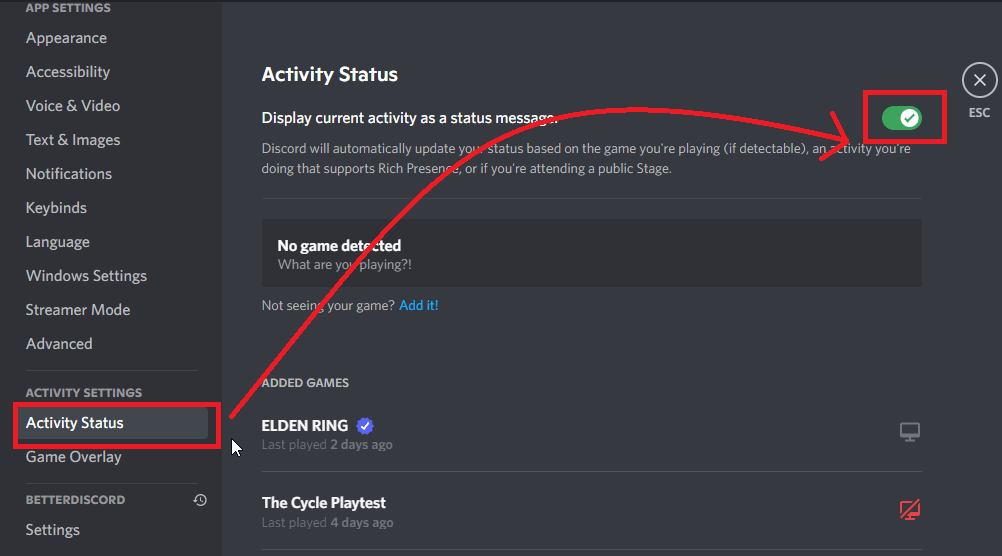
You do this by opening Discord, going to User Settings, and selecting “Activity Status.”
After you do this, look for the ”Display current activity as a status message” option.
There should be a checkmark next to it. Click on the checkmark to enable the feature. Turn it green to know that it’s enabled.
Your profile should now showcase the custom Rich Presence you created during all these steps.
If you don’t see it, restart Discord and it should be there.
Conclusion to End All Conclusions
Getting a sweet Rich Presence status on your Discord profile is much more engaging and improves socializing with friends.
If you’re a game publisher and want to make your product more engaging, create a custom Rich Presence for the players.
Whenever they’re playing the game, their Discord profiles will show a custom image, bringing it to other people’s attention.
If you have any questions about this lengthy guide or if you met with any problems with the steps, keep me posted in the comments below!